How to Build and Deploy a Serverless React App on Azure

Microsoft’s Azure platform has as many high-tech products as anyone could ever want, including the Azure Static Web Apps service. As the name suggests, the platform hosts static web apps that don’t require a back end. Azure supports React, Angular, Vue, Gatsby, and many more, out of the box.
However, you may run into situations where you want some back-end support, such as when you need the backend to run one or two API calls. For this task, Azure offers the Functions platform as well. Functions is a serverless computing platform that supports .NET, Node.js, Python, etc. It takes care of setting up a server, builds logging and exception handling, and provides a high availability environment at a reasonable price.
This tutorial will show you how to create a React application and deploy it to Azure Static Web Apps. The application will be on the Azure free tier, so you will not be able to rely on the built-in authentication providers that connect Azure and Okta to handle the authentication. Therefore, you will use the okta-react package from Okta to secure your single page application (SPA) manually. Once the user authenticates, they’ll be able to upload an image and receive a badge from a serverless Azure function.
This serverless function will handle the work of accepting the input image from the SPA and using a template to create a personalized badge for the user. Since you will be using the free version of Azure Static Web Apps, you will have to deploy the function as a Managed Azure Function.
You will write your application in Visual Studio Code and use the Azure extensions for Functions and Static Web Apps.
Prerequisites
- Node.js
- Azure Account
- GitHub Account
- Okta CLI
Okta has Authentication and User Management APIs that reduce development time with instant-on, scalable user infrastructure. Okta’s intuitive API and expert support make it easy for developers to authenticate, manage and secure users and roles in any application.
- Visual Studio Code
If you want to see the code, you can download it or fork it from the example on GitHub.
Table of Contents
- Create your Okta application
- Create your React application
- Write your Azure Serverless Function code
- Deploy your application to Azure Static Web Apps and Azure Functions
- Run your application
- Wrap up
Note: In May 2025, the Okta Integrator Free Plan replaced Okta Developer Edition Accounts, and the Okta CLI was deprecated.
We preserved this post for reference, but the instructions no longer work exactly as written. Replace the Okta CLI commands by manually configuring Okta following the instructions in our Developer Documentation.
Create your Okta application
Before you begin, you’ll need a free Okta developer account. Install the Okta CLI and run okta register to sign up for a new account. If you already have an account, run okta login.
Then, run okta apps create. Select the default app name, or change it as you see fit.
Choose Single-Page App and press Enter.
Use http://localhost:4280/login/callback for the Redirect URI and accept the default Logout Redirect URI of http://localhost:4280/login.
What does the Okta CLI do?
The Okta CLI will create an OIDC Single-Page App in your Okta Org. It will add the redirect URIs you specified and grant access to the Everyone group. It will also add a trusted origin for http://localhost:4280/login. You will see output like the following when it’s finished:
Okta application configuration:
Issuer:    https://dev-133337.okta.com/oauth2/default
Client ID: 0oab8eb55Kb9jdMIr5d6
NOTE: You can also use the Okta Admin Console to create your app. See Create a React App for more information.
Create your React application
The next step is to build your React application as a static web app. Begin as you would with most React apps by running npx create-react-app azure-static-app. After a few moments, your application will be ready to run. Once this happens, delete the .gitignore file and the .git folder that create-react-app produced. At this time, there is no way to prevent the task from adding these, but they will conflict with the Azure git files you will add soon.
Start by adding the dependencies you will need. cd azure-static-app into your React directory and run the following commands.
npm i @okta/okta-auth-js@6.2.0
npm i @okta/okta-react@6.4.3
npm i react-router-dom@5.3.0
npm i bootstrap@5.1.3
The @okta/okta-react library is the principal package you will use to log the user in. This package relies on @okta/okta-auth-js to work. react-router-dom will help secure your routes and provide a route for the login/callback. Finally, you will use Bootstrap to style the site.
Next, replace the contents of App.js with the following code.
import React from "react";
import { BrowserRouter as Router } from "react-router-dom";
import AppWithRouterAccess from "./AppWithRouterAccess";
import "bootstrap/dist/css/bootstrap.min.css";

const App = () => {
  return (
    <Router>
      <AppWithRouterAccess />
    </Router>
  );
};

export default App;
The code you’ve added makes the following changes:
- Imports Bootstrap to style the application
- prepare the application to use the
AppWithRouterAccessmethod that you’ll soon create - Wraps the
BrowserRoutercomponent fromreact-router-domso you can access theRoutesandRouteobjects in child components
Add the AppWithRouterAccess.jsx file to your src directory and add the following code to it.
import "./App.css";

import { Route, useHistory } from "react-router-dom";
import { OktaAuth, toRelativeUrl } from "@okta/okta-auth-js";
import { Security, LoginCallback } from "@okta/okta-react";

import Home from "./Home";

const oktaAuth = new OktaAuth({
  issuer: "https://{yourOktaDomain}/oauth2/default",
  clientId: "{yourOktaClientId}",
  redirectUri: window.location.origin + "/login/callback",
});

function AppWithRouterAccess() {
  const history = useHistory();

  const restoreOriginalUri = async (_oktaAuth, originalUri) => {
    history.replace(toRelativeUrl(originalUri || "/", window.location.origin));
  };

  return (
    <Security oktaAuth={oktaAuth} restoreOriginalUri={restoreOriginalUri}>
      <Route path="/" component={Home} />
      <Route path="/login/callback" component={LoginCallback} />
    </Security>
  );
}

export default AppWithRouterAccess;
This component creates the routes for your Home and LoginCallback components. It also initializes the OktaAuth object, which is passed into the Security component for the children to use. To do this, use the clientId and issuer that the Okta CLI returned when you created your Okta app and replace {yourOktaClientId} and {yourOktaDomain}. If you used a server other than your default authorization server, you will need to change the entire issuer, not just your domain.
Next, add Home.jsx to your src folder and add the following code.
import { useOktaAuth } from "@okta/okta-react";
import { useState } from "react";

function Home() {
  const { oktaAuth, authState } = useOktaAuth();

  const [image, setImage] = useState();
  const [display, setDisplay] = useState();

  const acceptImage = (e) => {
    setImage(e.target.files[0]);
  };

  const login = async () => oktaAuth.signInWithRedirect();
  const logout = async () => oktaAuth.signOut("/");

  const createBadge = async () => {
    var data = new FormData();
    data.append("file", image);

    // Ideally the Azure Function should call the `/userprofile` endpoint to get
    // the user name instead of relying on the client to send it since the client
    // could manipulate the data
    data.append("firstLetter", authState.idToken.claims.name[0]);

    const resp = await fetch("api/CreateBadge", {
      method: "POST",
      headers: {
        "okta-authorization": "Bearer " + authState.accessToken.accessToken,
      },
      body: data,
    });

    const blob = await resp.blob();
    setDisplay(URL.createObjectURL(blob));
  };

  return (
    <div className="App">
      <main role="main" className="inner cover container">
        <nav className="navbar navbar-expand-lg navbar-light bg-light ">
          <ul className="nav navbar-nav ml-auto navbar-right ms-auto">
            <li>
              {authState?.isAuthenticated && (
                <button className="btn btn-outline-secondary my-2 my-sm-0" onClick={logout}>
                  Logout
                </button>
              )}

              {!authState?.isAuthenticated && (
                <button className="btn btn-outline-secondary" onClick={login}>
                  Login
                </button>
              )}
            </li>
          </ul>
        </nav>

        <h1 className="cover-heading">Create your Intergalactic Mining Federation badge</h1>

        {!authState?.isAuthenticated && (
          <div>
            <p className="lead">In order to use this application you must be logged into your Okta account</p>
            <p className="lead">
              <button className="btn btn-primary" onClick={login}>
                Login
              </button>
            </p>
          </div>
        )}
        {authState?.isAuthenticated && (
          <div>
            <p className="lead">To Create your badge, upload your image below</p>
            <input onChange={acceptImage} name="image" type="file" />
            <button className="btn btn-primary" onClick={createBadge}>
              Upload
            </button>
            <br />
            {display && <img className="pt-4" alt="your IMF badge" src={display}></img>}
          </div>
        )}

        <footer
          className="bg-light text-center fixed-bottom"
          style={{
            width: "100%",
            padding: "0 15px",
          }}
        >
          <p>
            A Small demo using <a href="https://developer.okta.com/">Okta</a> to Secure an{" "}
            <a href="https://azure.microsoft.com/en-us/services/app-service/static/">Azure Static Web App </a> with a serverless{" "}
            <a href="https://azure.microsoft.com/en-us/services/functions/">Function</a>
          </p>
          <p>
            By <a href="https://github.com/nickolasfisher">Nik Fisher</a>
          </p>
        </footer>
      </main>
    </div>
  );
}

export default Home;
This file contains the bulk of your logic. First, it provides Login/Logout functionality using the useOktaAuth hook. With this hook, you can determine the user’s authenticated state. If the user is not authenticated, prompt them to do so; otherwise, you will allow them to use the badge creator.
The badge creator logic prompts users to upload a photo of themselves for the template. It then posts this to the nebulous api/CreateBadge. This route stands for the CreateBadge function that you will create later in this article. Azure will know how to find that route whether you’re running this application locally on Azure’s emulator or Azure’s infrastructure. It will even be able to route to the appropriate environment on Azure’s servers.
A note here: You might expect to send the accessToken in the Authorization header; however, Azure overwrites the Authorization header with its token by default. You can eliminate this step on the Azure standard pricing model by using the custom providers in the Static Web App and the Function. However, you will need to use this workaround on the free model.
In this tutorial, the client sends the username from the ID token. Ideally, the Azure Function should retrieve the username by making a call to the /userprofile endpoint. By having the Azure Function handle this, you can ensure you get the accurate username without relying on the client to send something potentially inaccurate.
One other note: Environment variables do not work at this time on Static Web Apps. If you attempt to use process.env.{variable} in your code and set it in the application settings, it will not work.
Finally, add StaticWebApp.config.json to your azure-static-app directory and add the code below.
{
    "navigationFallback": {
      "rewrite": "/index.html"
    }
}
This configuration file is necessary for single page apps to handle routing on the client. Specifically, you will need this for the login/callback route.
Test your React application
At this point, you can ensure your React application is working and connected to Okta properly. In the root of your React application, add a new file called .env and add the following code to it.
PORT=4280
The Azure emulator will run the application on 4280 by default, so we set up the Okta application to allow that port. However, React usually runs the application on port 3000. Using .env to set the port will enable us to override that behavior and run the app on 4280.
Next, run the npm run start command in your React application’s directory. You should be able to see your home screen and log in to Okta, but you will not be able to use the image feature yet.
Write your Azure Serverless Function code
You’ll need that api/CreateBadge endpoint to land somewhere. Open the Azure extension in VS Code, and use the Static Web Apps section to click Create HTTP Function. Select javascript as the language and name the function CreateBadge. The extension will create a new folder called api and another folder called CreateBadge with your Function code.
First, run cd ../api to enter the api folder (assuming you’re still in azure-static-app folder). You can install your dependencies first.
npm i @okta/jwt-verifier@2.3.0
npm i canvas@2.9.0
npm i parse-multipart-data@1.2.1
parse-multipart-data will help parse the image from the request body. You will use canvas to modify the image. Finally, @okta/jwt-verifier will verify the token passed in the header to authenticate the user. As I mentioned before, but worth mentioning again, if you are using the standard pricing model, then the authentication can and should be handled in the Azure portal using a custom provider. However, you are stuck doing the work yourself on the free tier.
Open api/CreateBadge/index.js and replace the code there with the following.
const { createCanvas, loadImage } = require("canvas");
const { rename } = require("fs");
const querystring = require("querystring");

const templateWH = [394, 225];
const profilePictureStart = [22, 48];
const profilePictureWH = [97, 121];
const letterStart = [250, 205];

const multipart = require("parse-multipart-data");

badgeTemplateUrl = "https://i.imgur.com/50dOBYK.png";

const OktaJwtVerifier = require("@okta/jwt-verifier");

const oktaJwtVerifier = new OktaJwtVerifier({
  issuer: "https://{yourOktaDomain}/oauth2/default",
});

const getAuthToken = (req) => {
  const header = req.headers["okta-authorization"];
  const tokenParts = header.split(" ");
  const token = tokenParts.length > 0 ? tokenParts[1] : "";

  return token;
};

const drawImage = async (req) => {
  const bodyBuffer = Buffer.from(req.body);
  const boundary = multipart.getBoundary(req.headers["content-type"]);
  const parts = multipart.parse(bodyBuffer, boundary);

  const canvas = createCanvas(templateWH[0], templateWH[1]);
  const ctx = canvas.getContext("2d");

  // Ideally this Azure Function should call the `/userprofile` endpoint to get
  // the user name instead of relying on the client to send it
  const firstLetter = parts.filter((r) => r.name === "firstLetter")[0].data.toString();

  const template = await loadImage(badgeTemplateUrl);
  ctx.drawImage(template, 0, 0, templateWH[0], templateWH[1]);

  ctx.font = "68px Calibri";
  ctx.fillStyle = "#fff";
  ctx.fillText(firstLetter, letterStart[0], letterStart[1]);

  const profileImage = await loadImage(parts[0].data);
  ctx.drawImage(profileImage, profilePictureStart[0], profilePictureStart[1], profilePictureWH[0], profilePictureWH[1]);

  return canvas;
};

module.exports = async function (context, req) {
  const accessToken = getAuthToken(req);
  const jwt = await oktaJwtVerifier.verifyAccessToken(accessToken, "api://default");

  const canvas = await drawImage(req);

  var stream = await canvas.pngStream();
  context.res.setHeader("Content-Type", "image/png");
  context.res.end(canvas.toBuffer("image/png"));
};
This file uses the OktaJwtVerifier to verify the token sent from the React front end. It does this by parsing the okta-authorization header. If the token is invalid, it will return a 403.
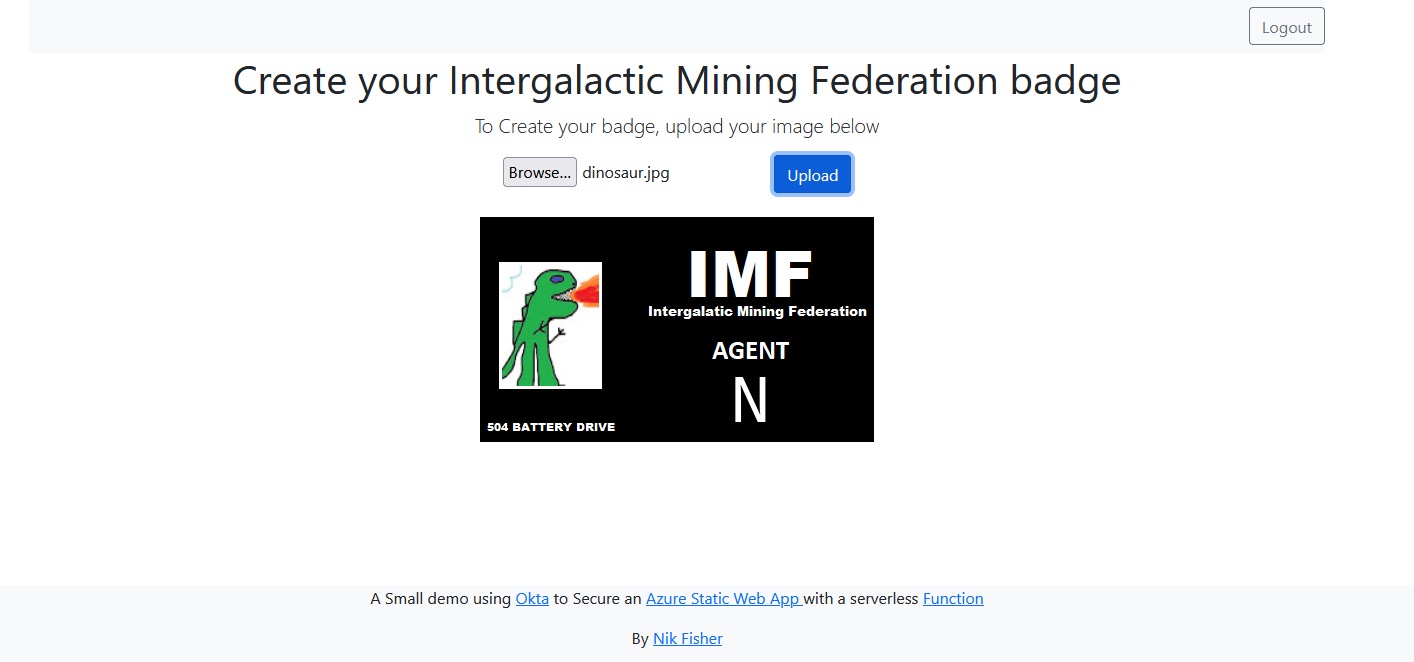
The other primary function of this code is to take the image uploaded by the user and modify a template image by adding the uploaded image to it. You will also pull the user’s name from the JWT and replace the name on the badge with the first letter of the user’s first name. If your name is “Okta Developers”, you’ll see “Agent O”. Assuming this was all a success, you would return the image to the SPA to display to the user.
Deploy your application to Azure Static Web Apps and Azure Functions
Click into the Azure VS Code extension again, and under the Static Web Apps section, click Create Static Web App…. Follow the prompts and add the following information. If you are new to Azure, you’ll first need to create a “Subscription”. Then answer the prompts as shown below:
- Azure Subscription Name - “My Azure Subscription”
- Azure Web App name -
azure-static-app - GitHub repo -
azure-static-app - Commit Message -
initial commit - Region - Select the region closest to you
- Framework - React
- Root of your app -
azure-static-app - Root of your api (if asked) -
api - Build - leave this blank
Everything will need a few moments to build. This process creates a new git repo on your GitHub account, configures the CI/CD for Azure Static Web Apps using GitHub Actions, creates your Azure Static Web App, and deploys your function and SPA code. Once it’s complete, you should be able to navigate to your newly created site.
Edit your Okta application
You will need to configure your Okta application for your newly deployed application. You used your localhost settings when you first configured your app. Now you need to add your Azure settings as well.
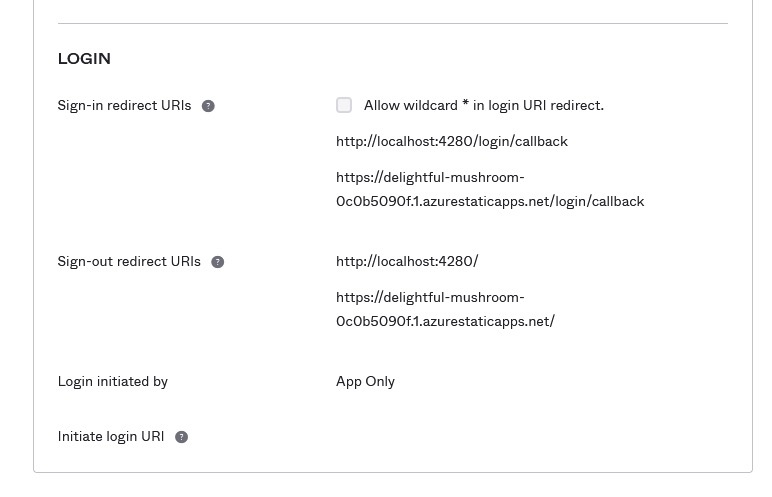
Edit your application and under the Login section, add your Azure domain with the /login/callback endpoint to the Sign-in redirect URIs section. Next, add the domain’s home page to your Sign-out redirect URIs section.

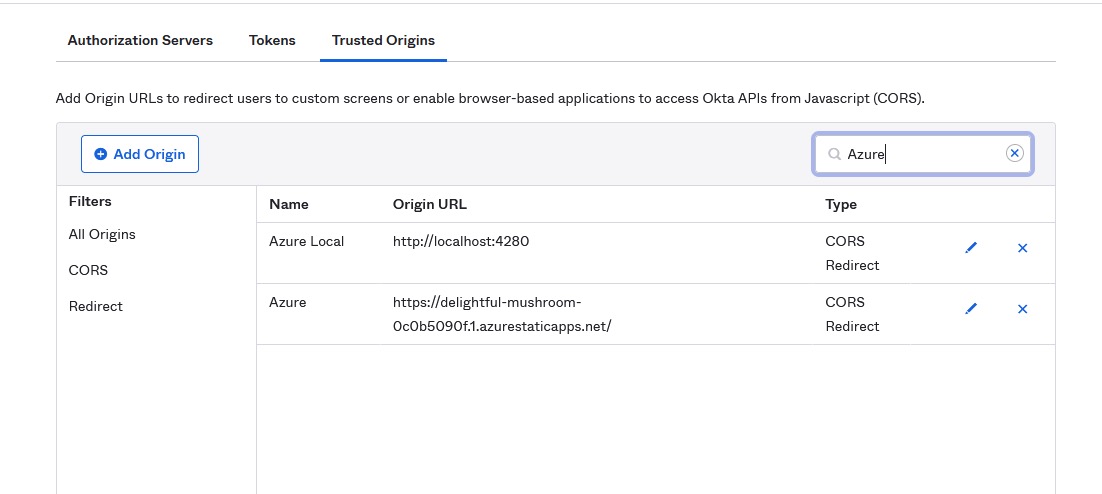
Next, navigate to Security > API and click Trusted Origins. Add your Azure domain to this list.

Run your application
Finally, navigate back to your Azure domain and log in using Okta. Select an image you want to use for your profile picture and click Upload. After a moment, your function should return your new badge.

Use the Azure emulator
If you’ve run into an error deploying and need to debug your project locally, you can use the Azure Static Web App emulator to tie your full product together. You’ll need to install some npm packages to run both the web app and the API functions.
In the terminal, run the following commands to install the necessary packages:
npm install -g @azure/static-web-apps-cli azure-functions-core-tools
npm install -g azure-functions-core-tools@3 --unsafe-perm true
Navigate to the root directory of the project and run the following command to start the Static Web App emulator, run the web app in dev mode, and also run the API function:
swa start http://localhost:4280 --app-location azure-static-app --run="npm start" --api-location ./api --func-args="--javascript"
It’s possible to run this app from the build directory, but you will lose the benefits of hot-reloading as you make changes.
Wrap up
In this tutorial, you learned how to create a React app and deploy it to Azure as a Static Web App. You also learned how to build a Function in Azure and call it from your Static Web App. Finally, you learned how to secure both the Function and the Static Web App using Okta. Want to explore some related resources for building apps on the Azure platform? Take a look at some of these other Okta Developer blog posts.
- How to Deploy Your .NET Core App to Google Cloud, AWS or Azure
- Build a Simple Microservice with C# Azure Functions
- Use Azure Cosmos DB with Your ASP.NET App
Make sure you follow us on Twitter and subscribe to our YouTube channel. If you have any questions or want to share what tutorial you’d like to see next, please comment below.
Okta Developer Blog Comment Policy
We welcome relevant and respectful comments. Off-topic comments may be removed.