How I Built an Okta Documentation Chatbot in Python

In today’s fast-paced world of technology, developers must navigate through detailed API documentation to integrate with software solutions. As a Developer Support Intern at Okta, I noticed developers underutilizing Okta’s Developer Documentation. To help them benefit from the wealth of information in these docs, I was inspired to build a tool using OpenAI. Leveraging ChatGPT, I built ✨Oktanaut✨, a versatile Python chatbot running on Jupyter Notebook that makes access to information on Okta’s Developer Documentation simple and straightforward.
 – Image source: Okta Developer GitHub
Evolution of Oktanaut, a Python Chatbot
I developed two versions of Oktanaut. The first version was a specific approach, offering greater precision rather than general knowledge. I built the prototype chatbot using LlamaIndex and trained it on the Okta Developer Documentation. While this version generated accurate responses due to its focused training, it could not handle diverse questions.
The second version, a versatile approach, utilized the capabilities of the OpenAI GPT-3.5 API; it generated responses based on a broader sample of user inquiries. This version handled various questions, providing a dynamic, self-learning, and interactive experience.
The trade-off between precision and versatility was obvious when comparing the two versions. The LLamaIndex-based Oktanaut version excelled in accuracy, while the GPT-3.5-powered version generated better responses to a broader set of questions. The final chatbot I chose to demo in this blog uses OpenAI API as it has bigger models to run inquiries and is more user-friendly.
Meticulous Training on Okta’s Developer Documentation for Enhanced Performance
For both versions, meticulous training was a necessary building block. Carefully refining the training data helped the bot produce more accurate responses to edge cases and custom-specific questions. I collected training data, including curated sample questions, answers, and information provided by Okta’s Developer Support Engineers. I stored this data in Google Drive to run on Colab. Additionally, I transformed the chatbot into a self-learning entity by storing historical interactions, allowing it to learn from its mistakes. This self-improvement mechanism allowed the chatbot to utilize context information from past responses within the session to provide more informed responses.
Personalizing the Conversational Experience with the Python Chatbot AI
I programmed the chatbot to greet users with its name, functionality, and purpose. Doing so added a personal touch that will help minimize potential confusion users may have when interacting with the chatbot.
I utilized a Python library called Panel on the frontend to achieve a user-friendly interface. Building the interface was not as simple as I first expected. The Panel library has several bugs and glitches, and considering a frontend built-in Python is uncommon. When I considered deployment options, I decided to run Oktanaut on Jupyter Notebook to ensure a simple setup process for everyone.
Demonstrating Oktanaut’s AI Chat Potential
The completed code for the OpenAI version of the chatbot can be found here.
Key terms to note before diving into the Python code:
model:"gpt-3.5-turbo": Specifies the GPT-3.5 Turbo model used for conversation.messages: The list of messages that make up the conversation.temperature: A parameter that controls the randomness of the model’s responses.continue_conversation: This function takes a list of messages as input and continues the conversation with the GPT-3.5 Turbo model. It sends the messages to the model and receives a response.add_prompts_conversation: This function adds prompts to the conversation and retrieves responses from the chatbot.client_prompt: The user asks a question about Okta in this input field.role: The user’s input adds to the conversation with the role “user.”continue_conversation: This function retrieves the chatbot’s response in string format.assistant: This role adds The chatbot’s response to the conversation.context list: This initializes the conversation with a system message that introduces Oktanaut, the chatbot. It provides information about the bot’s purpose and capabilities.pn.extension(): This line initializes the Panel library.panels list: This list stores the components displayed in the web interface.client_prompt input field: This widget allows users to input their questions or prompts for Oktanaut.button_conversation: This submits the user’s question, calls the function and queries the API, leading to the conversation with the chatbot.interactive_conversation function binding: This binds the add_prompts_conversation function to the button_conversation button, so the function is called when the user clicks the button.dashboard layout: This section assembles the dashboard for the chatbot, including the input field, the conversation button, and the chatbot’s responses.
def continue_conversation(messages, temperature=0):
    response = openai.ChatCompletion.create(
        model="gpt-3.5-turbo",
        messages=messages,
        temperature=temperature,
    )
    #print(str(response.choices[0].message["content"]))
    return response.choices[0].message["content"]
def add_prompts_conversation(_):
    prompt = client_prompt.value_input
    client_prompt.value = ''

    context.append({'role':'user', 'content':f"{prompt}"})

    response = continue_conversation(context)

    context.append({'role':'assistant', 'content':f"{response}"})

    panels.append(
        pn.Row('Developer:', pn.pane.Markdown(prompt, width=600)))
    panels.append(
        pn.Row('Oktanaut:', pn.pane.Markdown(response, width=600)))

    return pn.Column(*panels)
context = [ {'role':'system', 'content':"""'I am Oktanaut, a helpful chatbot meant to answer your questions about Okta and OAuth Developer Documentation. I answer questions from Okta Developer Documentation. How may I help you? (Say "thank you" to end the session) \n'"""} ]

pn.extension()

panels = []

client_prompt = pn.widgets.TextInput(value="Hi", placeholder='Enter your questions here...')
button_conversation = pn.widgets.Button(name="Chat with Oktanaut!")

interactive_conversation = pn.bind(add_prompts_conversation, button_conversation)

dashboard = pn.Column(
    client_prompt,
    pn.Row(button_conversation),
    pn.panel(interactive_conversation, loading_indicator=True),
)

dashboard
The code for the Jupiter Python Notebook above, okta-python-chatbot-example /GPTChatbot.ipynb, is for summoning Oktanaut.
Here’s a step-by-step walkthrough of how to run the code:
-
With a Google account, ensure you have access to Colab; this will be the environment we will use to run the Python scripts.
-
Library installation: The script begins with installing the required Python packages:
These packages work with the GPT-3.5 model, create the web interface, and manage the chatbot’s conversation. The LlamaIndex package is only used to read data in the OpenAI implementation of the bot.
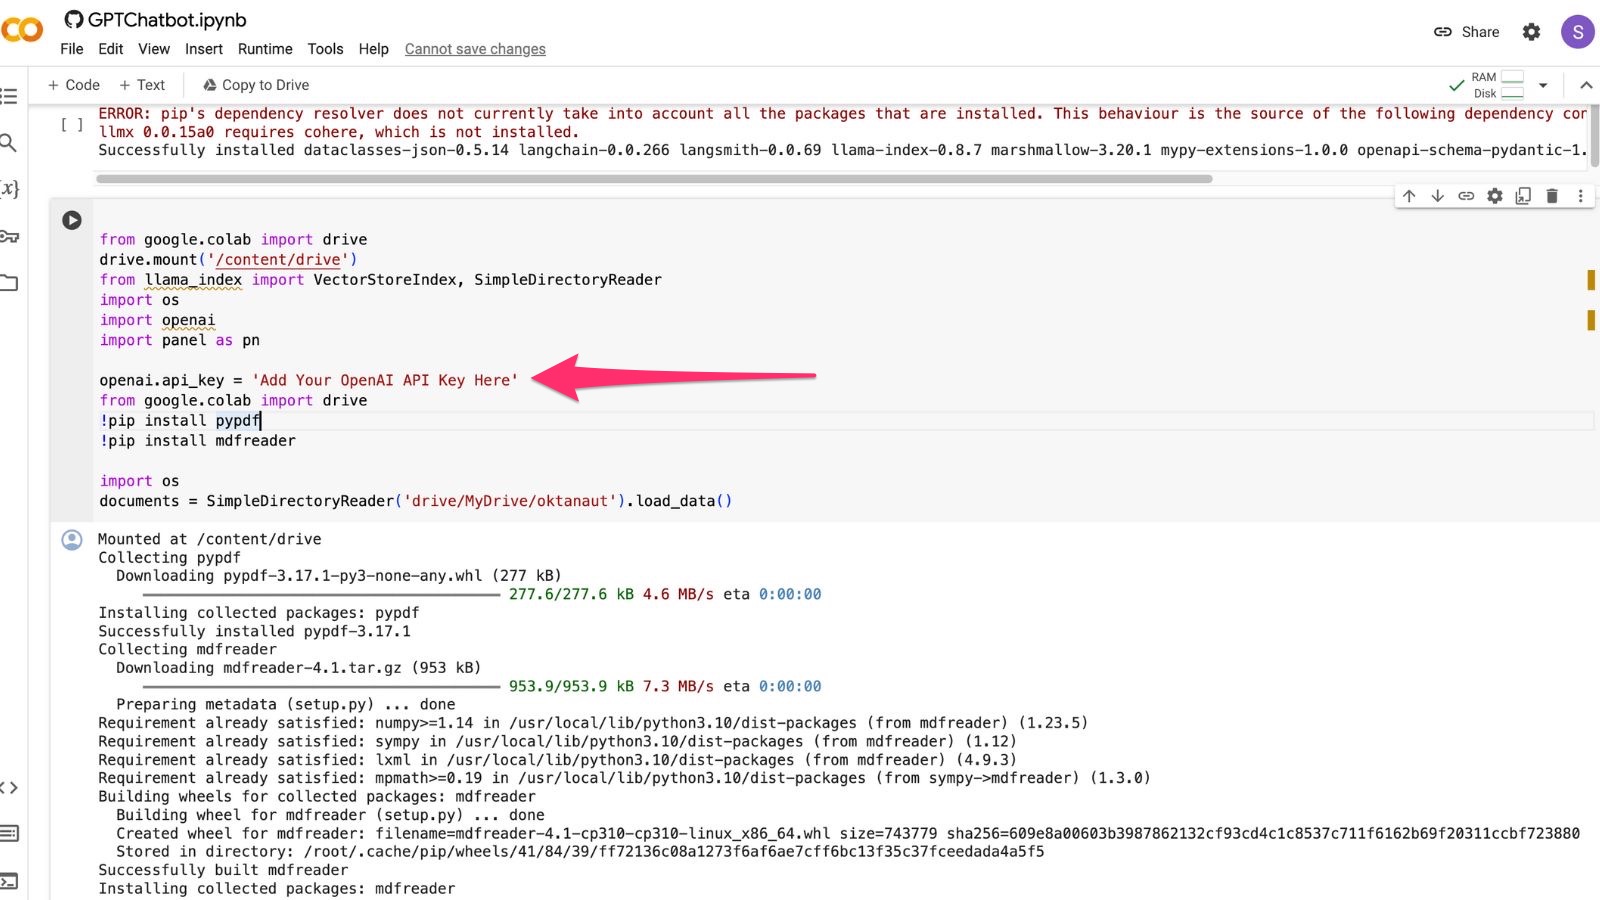
- Create an OpenAI account and follow these instructions to obtain an API Key. On line 161 of
GPTChatbot.ipynb, replace the API Key code snippet with your API Key. ChatGPT used to offer free credits to use, but it now costs five or more dollars to purchase API usage.

-
Download the Okta Developer Documentation files from here, and extract the archive. Upload the archive contents to a folder named ‘oktanaut’ in your Google Drive.
Make sure the training files are in theoktanautfolder, not in an additional folder within it. If you change the name of the folder where you keep the files in your Google Drive, update line 167 ofGPTChatbot.ipynbto the correct path. Alternatively, you can download the files directly from the Okta Developer Documentation Repository, or supply your own custom training data. -
Run the
GPTChatbot.ipynbnotebook in your Colab development environment. -
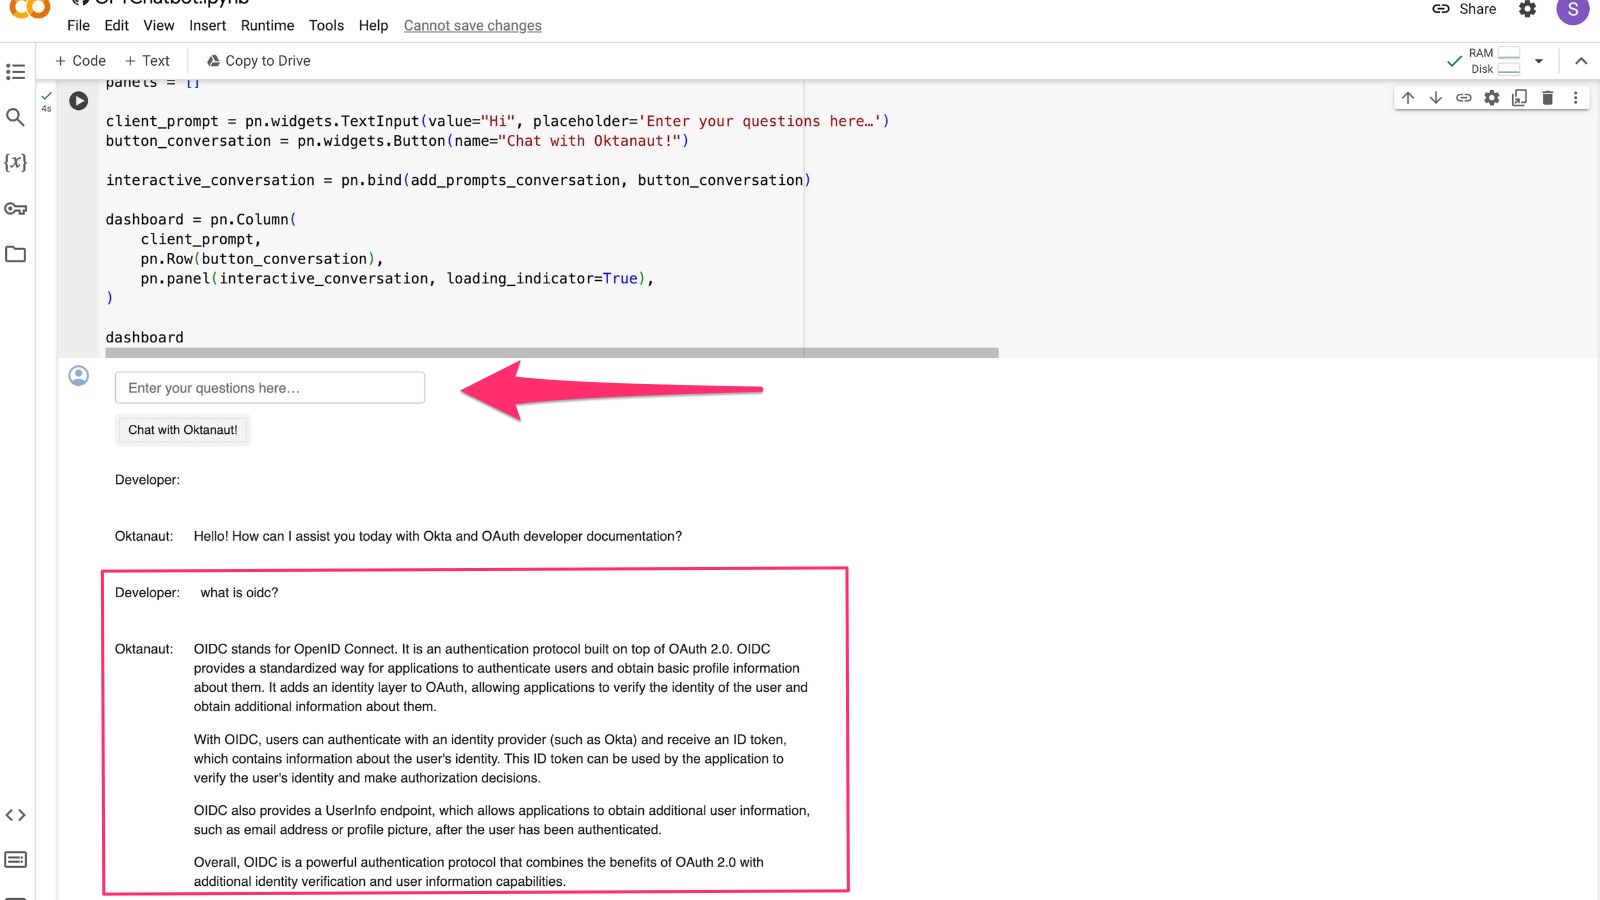
After running the script, a web interface displays an input field and a “Chat with Oktanaut!” button.
-
Enter your questions about the Okta Developer Documentation in the input field.
-
To submit your question, click the “Chat with Oktanaut!” button to begin a conversation with the Python chatbot.
-
Oktanaut will answer your question with an AI-generated response using its knowledge from the developer documentation, training data from internal support engineers, and the OpenAI API. The responses will appear on the web interface in real-time.
-
Continue the conversation by entering additional questions or prompts and clicking the button. The bot will use your questions from earlier in the conversation to improve its understanding of your needs, and provide contextually appropriate answers as you converse with it.
-
To end the session, say “Thank you” or leave the web page.

Further Python Chatbot Improvements
I am enthusiastic about enhancing Oktanaut’s training by incorporating information from the Okta Dev Forum and Okta’s Software Developer Kits (SDKs). In the future, I hope to collaborate with the Okta Developer Documentation team to improve information gaps in the documentation. I also want to add a feature to automatically update to the latest version of the Okta Developer Documentation so that the data Oktanaut references is up-to-date and reliable.
Have you thought about building your own chatbot with AI? Would you like to know more about how I built Oktanaut? Let me know in the comments below! Want to stay in touch? Follow our social channels @oktadev on Twitter and subscribe to our YouTube channel.
Python Chatbot Resources
Changelog:
- Feb 23, 2024: Added additional tags
Okta Developer Blog Comment Policy
We welcome relevant and respectful comments. Off-topic comments may be removed.