Build a Microservices Architecture for Microbrews with Spring Boot
Heads up... this blog post is old!
For an updated version of this blog post, see Java Microservices with Spring Boot and Spring Cloud.
Adopting a microservice architecture provides unique opportunities to add failover and resiliency to your systems, so your components can handle load spikes and errors gracefully. Microservices make change less expensive too. It can also be a good idea when you have a large team working on a single product. Your project can likely be broken up into components that can function independently of one another. Once components can function independently, they can be built, tested, and deployed independently. This gives an organization and its teams the agility to develop and deploy very quickly.
In a previous article, I showed you how to build a Spring Boot API with an Angular client. I then showed you how to convert the Angular app into a progressive web application that works offline. The Angular PWA is a good example of a resilient application because it still works when connectivity fails. Did you know you can develop similar resiliency in your API with Spring Boot, Spring Cloud, and a microservices architecture? This article shows you how to convert the previously created Spring Boot application to use microservices. You’ll create a beer catalog service, an edge service (for filter and displaying good beers), and a Eureka service that registers the services and allows them to communicate with one another.
Before we dive into the code tutorial, I’d like to talk a bit about microservices, their history, and why you should (or should not) consider a microservices architecture for your next project.
History of Microservices
According to Wikipedia, the term “microservice” was first used as a common architecture style at a workshop of software architects near Venice in May 2011. In May 2012, the same group decided “microservices” was a more appropriate name.
Adrian Cockcroft, who was at Netflix at the time, described this architecture as “fine-grained SOA”. Martin Fowler and James Lewis wrote an article titled simply Microservices on March 25, 2014. Years later, this is still considered the definitive article for microservices.
Organizations and Conway’s Law
Technology has traditionally been organized into technology layers: UI team, database team, operations team. When teams are separated along these lines, even simple changes can lead to a cross-team project sucking down huge chunks of time and budget.
A smart team will optimize around this and choose the lesser of two evils; forcing the logic into whichever application they have access to. This is an example of Conway’s Law in action.
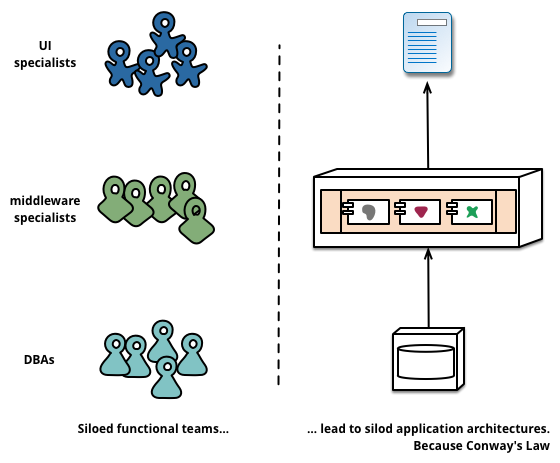
Any organization that designs a system (defined broadly) will produce a design whose structure is a copy of the organization’s communication structure.
— Melvyn Conway, 1967
Microservices Architecture Philosophy
The philosophy of a microservices architecture is essentially equal to the Unix philosophy of “Do one thing and do it well”. The characteristics of a microservices architecture are as follows:
- Componentization via services
- Organized around business capabilities
- Products not projects
- Smart endpoints and dumb pipes
- Decentralized governance
- Decentralized data management
- Infrastructure automation
- Design for failure
- Evolutionary design
Why Microservices?
For most developers, dev teams, and organizations, it’s easier to work on small “do one thing well” services. No single program represents the whole application, so services can change frameworks (or even languages) without a massive cost. As long as the services use a language agnostic protocol (HTTP or lightweight messaging), applications can be written in several different platforms - Java, Ruby, Node, Go, .NET, etc. - without issue.
Platform-as-a-Service (PaaS) providers and containers have made it easy to deploy microservices. All the technologies needed to support a monolith (e.g. load balancing, discovery, process monitoring) are provided by the PaaS, outside of your container. Deployment effort comes close to zero.
Are Microservices the Future?
Architecture decisions, like adopting microservices, are usually only evident several years after you make them. Microservices have been successful at companies like LinkedIn, Twitter, Facebook, Amazon, and Netflix. But that doesn’t mean they’ll be successful for your organization. Component boundaries are hard to define. If you’re not able to create your components cleanly, you’re just shifting complexity from inside a component to the connections between the components. Also, team capabilities are something to consider. A weak team will always create a weak system.
You shouldn’t start with a microservices architecture. Instead, begin with a monolith, keep it modular, and split it into microservices once the monolith becomes a problem.
— Martin Fowler
Build a Microservices Architecture with Spring Boot, Spring Cloud, and Netflix Eureka
Netflix Eureka is a REST-based service that is primarily used in the AWS cloud for locating services for the purpose of load balancing and failover of middle-tier servers.
Spring Cloud is a developer’s dream when it comes to implementing and deploying a microservices architecture.
Spring Cloud provides tools for developers to quickly build some of the common patterns in distributed systems (e.g. configuration management, service discovery, circuit breakers, intelligent routing, micro-proxy, etc.). Coordination of distributed systems leads to boilerplate patterns. Using Spring Cloud, developers can quickly stand up services and applications that implement those patterns. They will work well in any distributed environment, including the developer’s own laptop, bare metal data centers, and managed platforms such as Cloud Foundry.
Spring Cloud Netflix provides Netflix OSS integrations for Spring Boot applications. Patterns provided include Service Discovery (Eureka), Circuit Breaker (Hystrix), Intelligent Routing (Zuul) and Client Side Load Balancing (Ribbon).
To learn more about service discovery and resolution with Eureka, watch Josh Long’s Microservice Registration and Discovery with Spring Cloud and Netflix’s Eureka.
Create a Eureka Service
To begin, create a spring-boot-microservices-example directory on your hard drive. Navigate to start.spring.io.
Enter eureka-service as an artifact name and select Eureka Server as a dependency.

Click the Generate Project button and expand eureka-service.zip into the spring-boot-microservices-example directory.
TIP: You could also create your project using start.spring.io’s API. The following HTTPie command will create the same app as the steps above:
http https://start.spring.io/starter.zip artifactId==eureka-service bootVersion==2.0.5.RELEASE \
   name==eureka-service dependencies==cloud-eureka-server baseDir==eureka-service | tar -xzvf -
Modify eureka-service/src/main/resources/application.properties to add a port number and disable registration.
server.port=8761
eureka.client.register-with-eureka=false
Open eureka-service/src/main/java/com/example/eurekaservice/EurekaServiceApplication.java and add @EnableEurekaServer above @SpringBootApplication.
import org.springframework.cloud.netflix.eureka.server.EnableEurekaServer;

@EnableEurekaServer
@SpringBootApplication
This annotation, and the aforementioned properties, configures a registry that other applications can talk to.
Start the application from the command line using:
./mvnw spring-boot:run
Or if you’re using Windows:
mvnw.bat spring-boot:run
After it starts, you should be able to open http://localhost:8761 and see there are no services available.

Create a Beer Catalog Service
Refresh start.spring.io to start creating a new project. Use beer-catalog-service for the
artifact name and add the following dependencies:
- Actuator: features to help you monitor and manage your application
- Eureka Discovery: for service registration
- JPA: to save/retrieve data
- H2: an in-memory database
- Rest Repositories: to expose JPA repositories as REST endpoints
- Web: Spring MVC and embedded Tomcat
- DevTools: to auto-reload the application when files change
- Lombok: to reduce boilerplate code
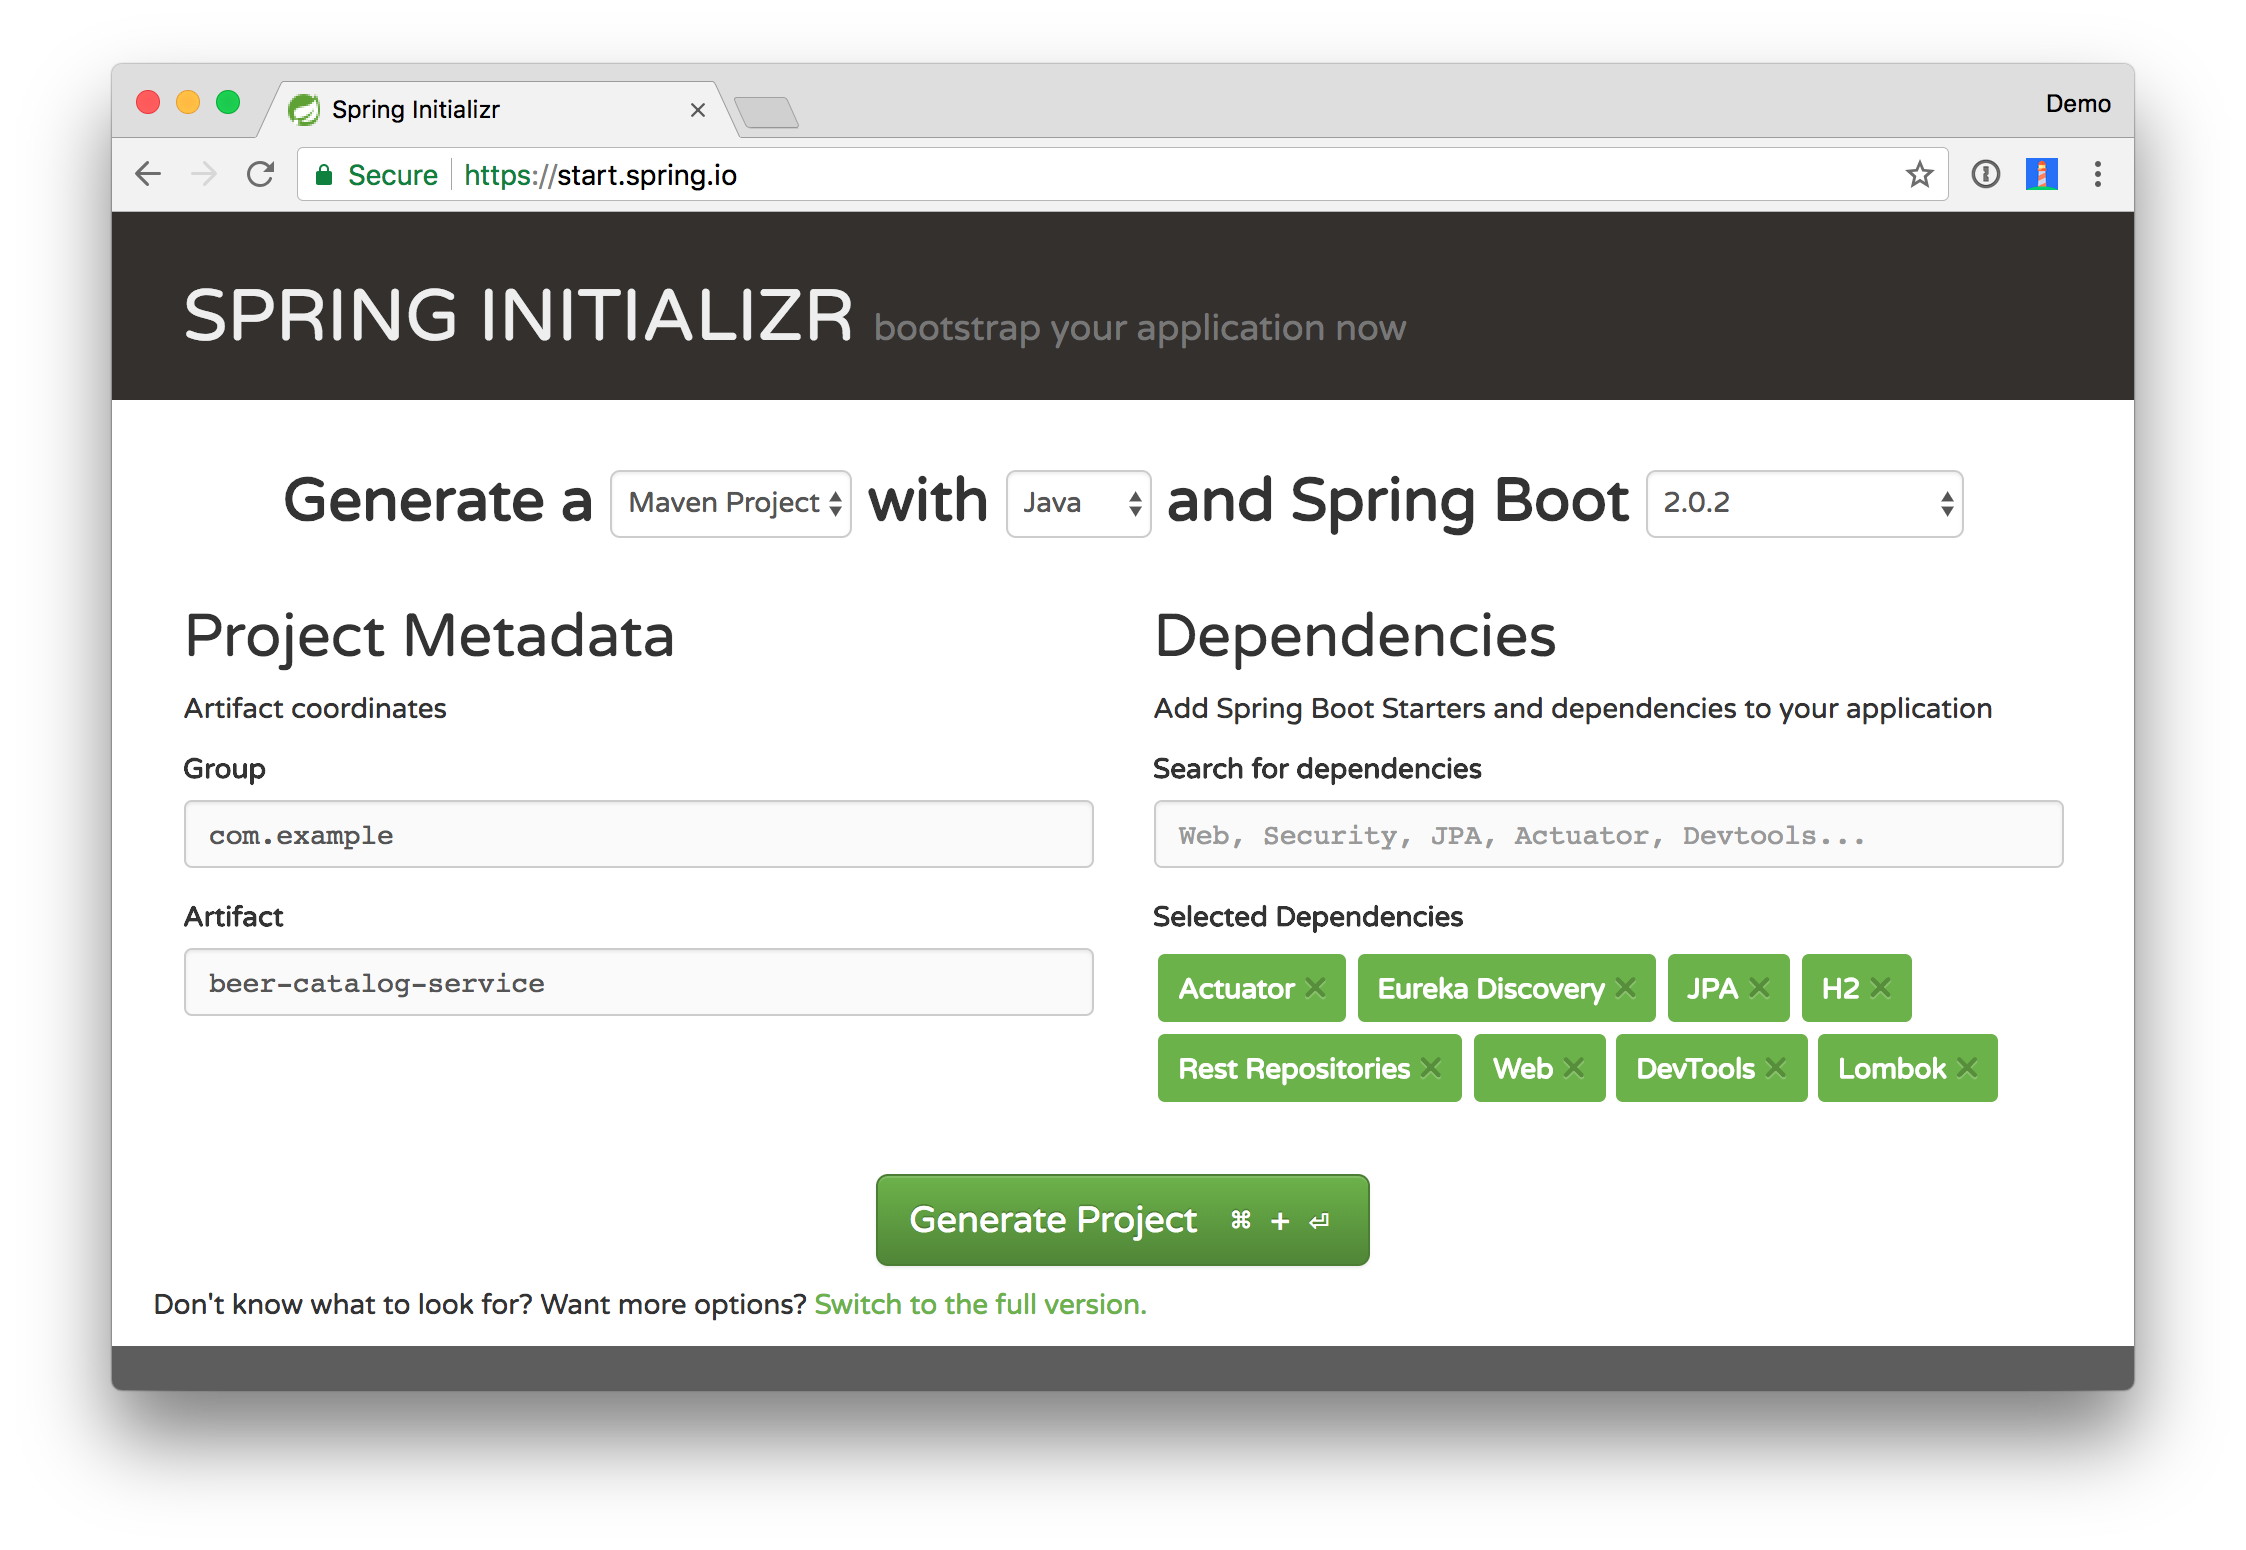
Click the Generate Project button and expand beer-catalog-service.zip into spring-boot-microservices-example and
open the project in your favorite IDE. I recommend IntelliJ IDEA because it’s great for
Java and web development.
TIP: To create this same project using start.spring.io’s API, run the following:
http https://start.spring.io/starter.zip artifactId==beer-catalog-service bootVersion==2.0.5.RELEASE \
  name==beer-catalog-service dependencies==actuator,cloud-eureka,data-jpa,h2,data-rest,web,devtools,lombok \
  baseDir==beer-catalog-service | tar -xzvf -
Create a Beer entity, a JpaRepository for it, and a CommandLineRunner to populate the database with default data.
You can add this code to BeerCatalogServiceApplication.java, or create separate files for each class. The code below
assumes you’re putting all classes in the same file.
@Data
@AllArgsConstructor
@Entity
class Beer {

    public Beer(String name) {
        this.name = name;
    }

    @Id
    @GeneratedValue
    private Long id;

    private String name;
}

@RepositoryRestResource
interface BeerRepository extends JpaRepository<Beer, Long> {}

@Component
class BeerInitializer implements CommandLineRunner {

    private final BeerRepository beerRepository;

    BeerInitializer(BeerRepository beerRepository) {
        this.beerRepository = beerRepository;
    }

    @Override
    public void run(String... args) throws Exception {
        Stream.of("Kentucky Brunch Brand Stout", "Good Morning", "Very Hazy", "King Julius",
                "Budweiser", "Coors Light", "PBR")
                .forEach(beer -> beerRepository.save(new Beer(beer)));

        beerRepository.findAll().forEach(System.out::println);
    }
}
If you’re using an editor that doesn’t auto-import classes, here’s the list of imports needed at the top of BeerCatalogServiceApplication.java.
import lombok.AllArgsConstructor;
import lombok.Data;
import org.springframework.boot.CommandLineRunner;
import org.springframework.boot.SpringApplication;
import org.springframework.boot.autoconfigure.SpringBootApplication;
import org.springframework.cloud.client.discovery.EnableDiscoveryClient;
import org.springframework.data.jpa.repository.JpaRepository;
import org.springframework.data.rest.core.annotation.RepositoryRestResource;
import org.springframework.stereotype.Component;

import javax.persistence.Entity;
import javax.persistence.GeneratedValue;
import javax.persistence.Id;
import java.util.stream.Stream;
Add an application name in beer-catalog-service/src/main/resources/application.properties to display in the Eureka
service, and set the port to 8080.
server.port=8080
spring.application.name=beer-catalog-service
Start the beer-catalog-service with Maven (mvn spring-boot:run) or your IDE.
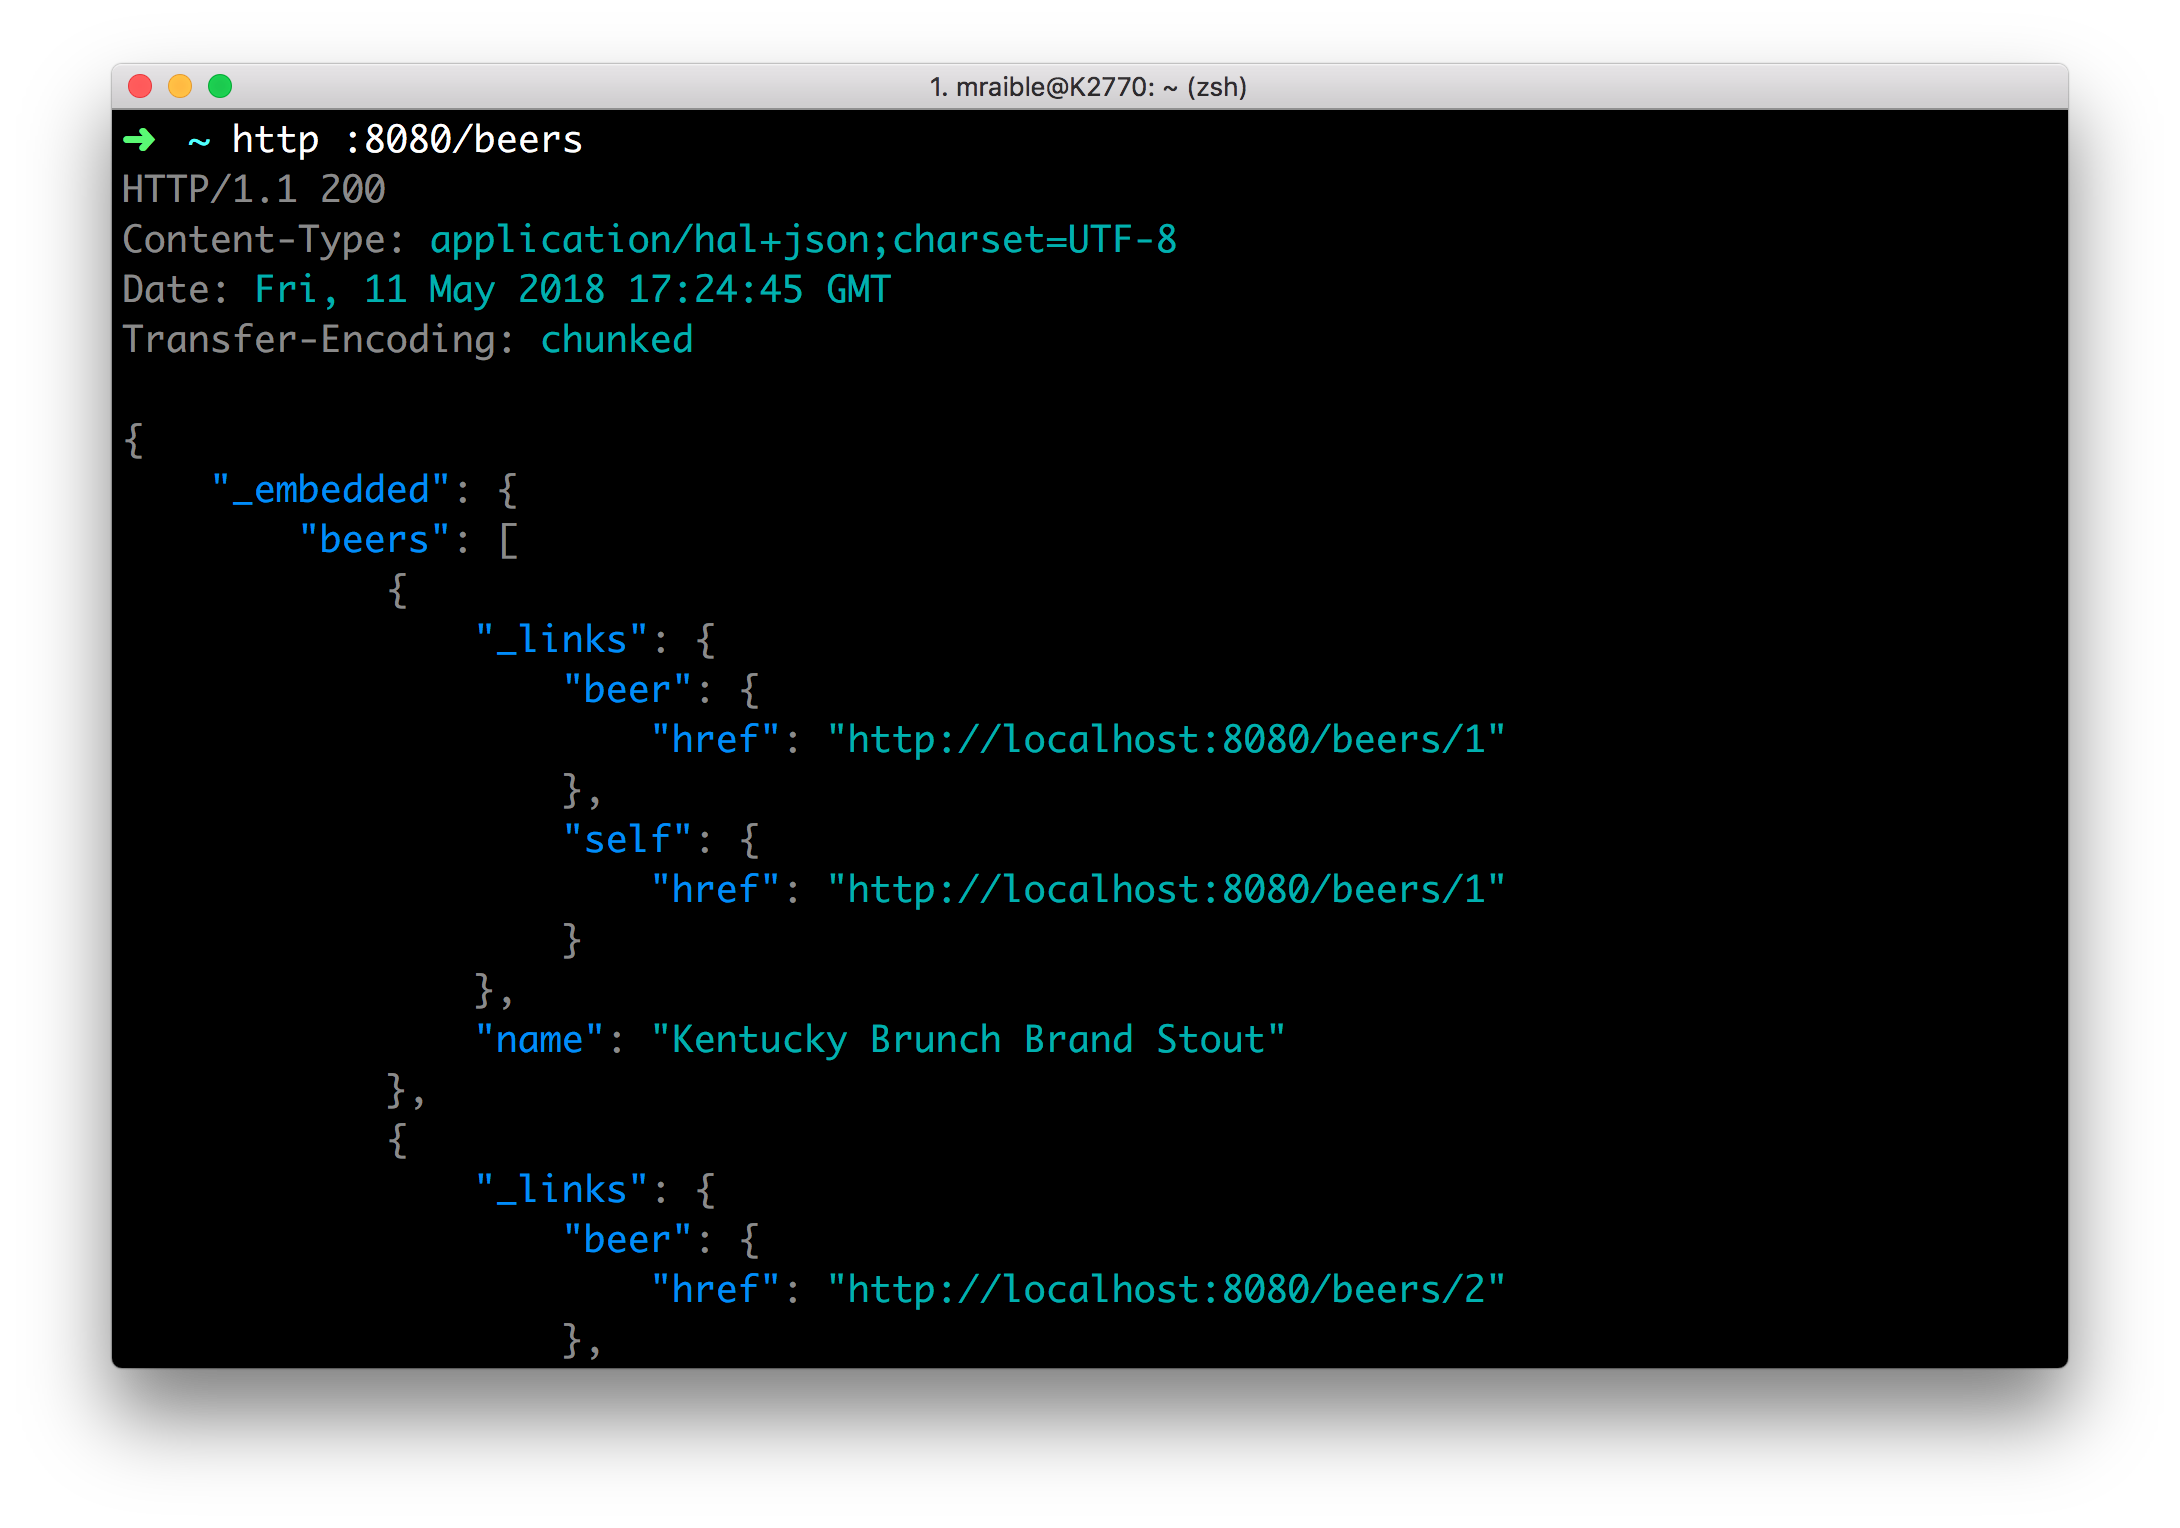
At this point, you should be able to use HTTPie to see the list of beers from the catalog service.
http :8080/beers

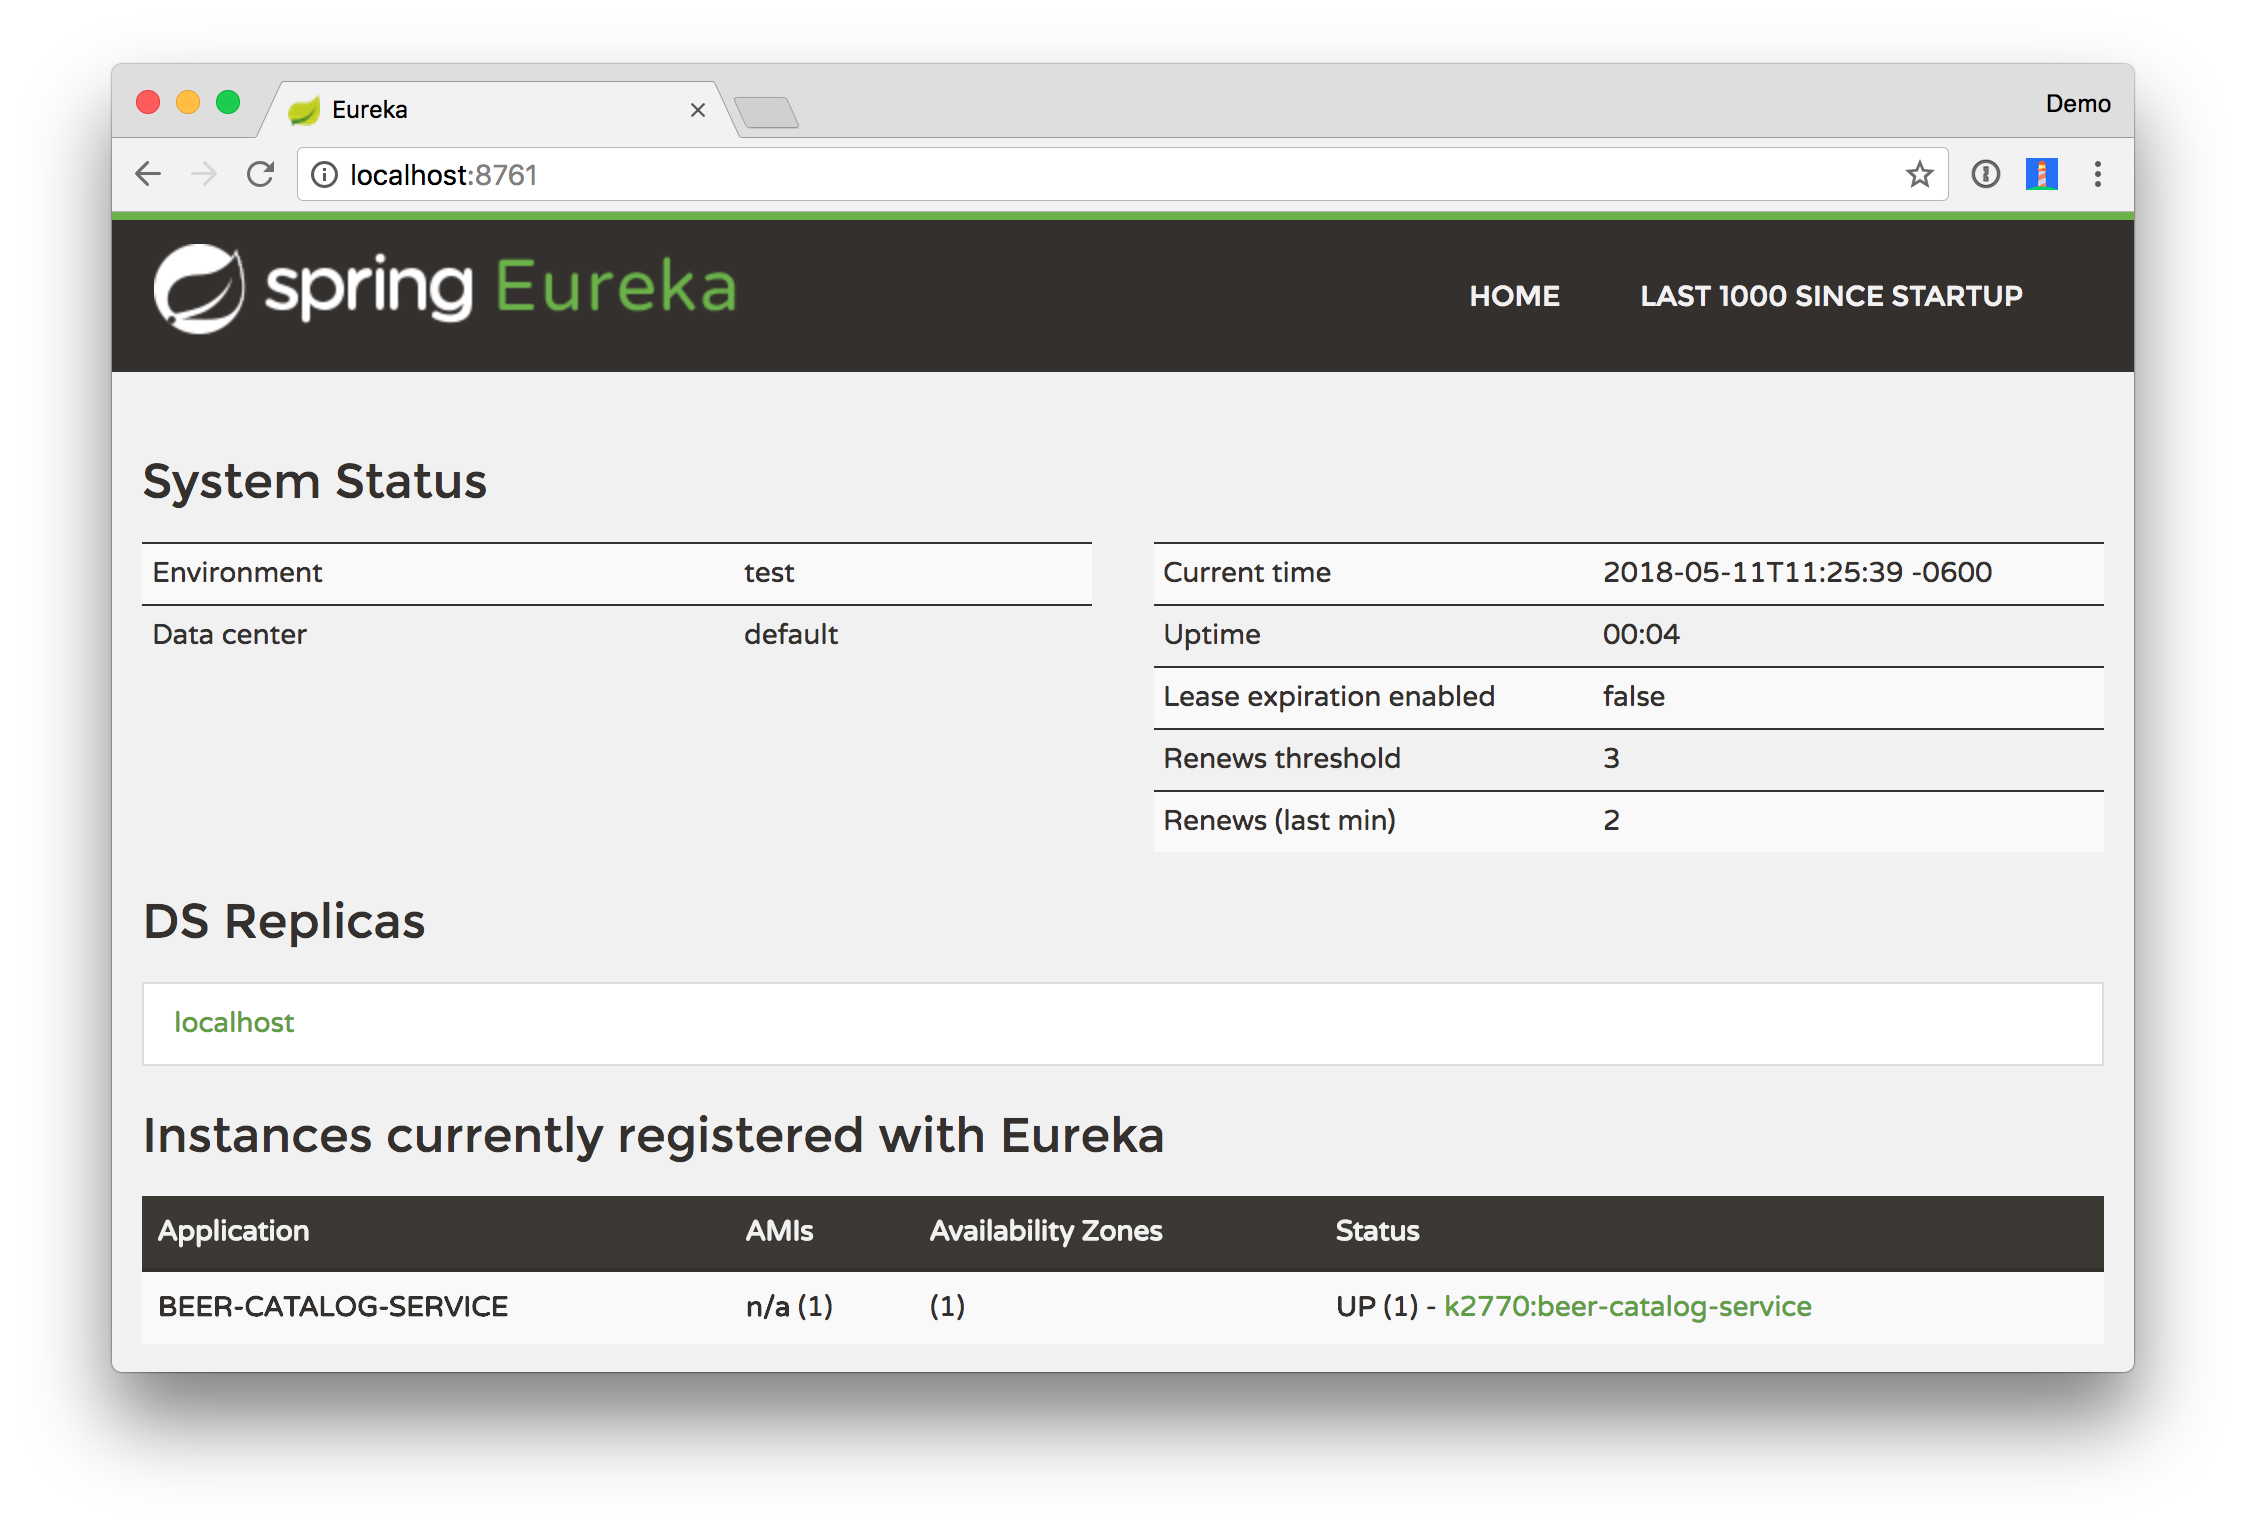
However, if you open the Eureka Service at http://localhost:8761, you will not see the service registered. To register
the beer-catalog-service, you need to add @EnableDiscoveryClient to BeerCatalogServiceApplication.java.
import org.springframework.cloud.client.discovery.EnableDiscoveryClient;

@EnableDiscoveryClient
@SpringBootApplication
public class BeerCatalogServiceApplication {

    public static void main(String[] args) {
        SpringApplication.run(BeerCatalogServiceApplication.class, args);
    }
}
Re-compile this class, watch devtools restart your application, and return to http://localhost:8761. If you’re not
using an IDE, it might be easiest to cancel and restart mvn spring-boot:run. Now the service should show up.
By default IntelliJ IDEA does not automatically compile files when the application is running. To enable the "Compile on save" feature:
- Go to Preferences > Build, Execution, Deployment -> Compiler and enable "Build project automatically"
- Open the Action window:
- Linux: CTRL+SHIFT+A
- Mac: SHIFT+COMMAND+A
- Windows: CTRL+ALT+SHIFT+/
- Enter Registry... and enable
compiler.automake.allow.when.app.running
Create an Edge Service
The edge service will be similar to the standalone beer service created in Bootiful Development with Spring Boot and Angular. However, it will have fallback capabilities which prevent the client from receiving an HTTP error when the service is not available.
Navigate to start.spring.io and create an edge-service application with the following dependencies:
- Eureka Discovery: for service registration
- Feign: a declarative web service client
- Zuul: provides intelligent routing
- Rest Repositories: to expose JPA repositories as REST endpoints
- Web: Spring MVC and embedded Tomcat
- Hystrix: a circuit breaker to stop cascading failure and enable resilience
- Lombok: to reduce boilerplate code
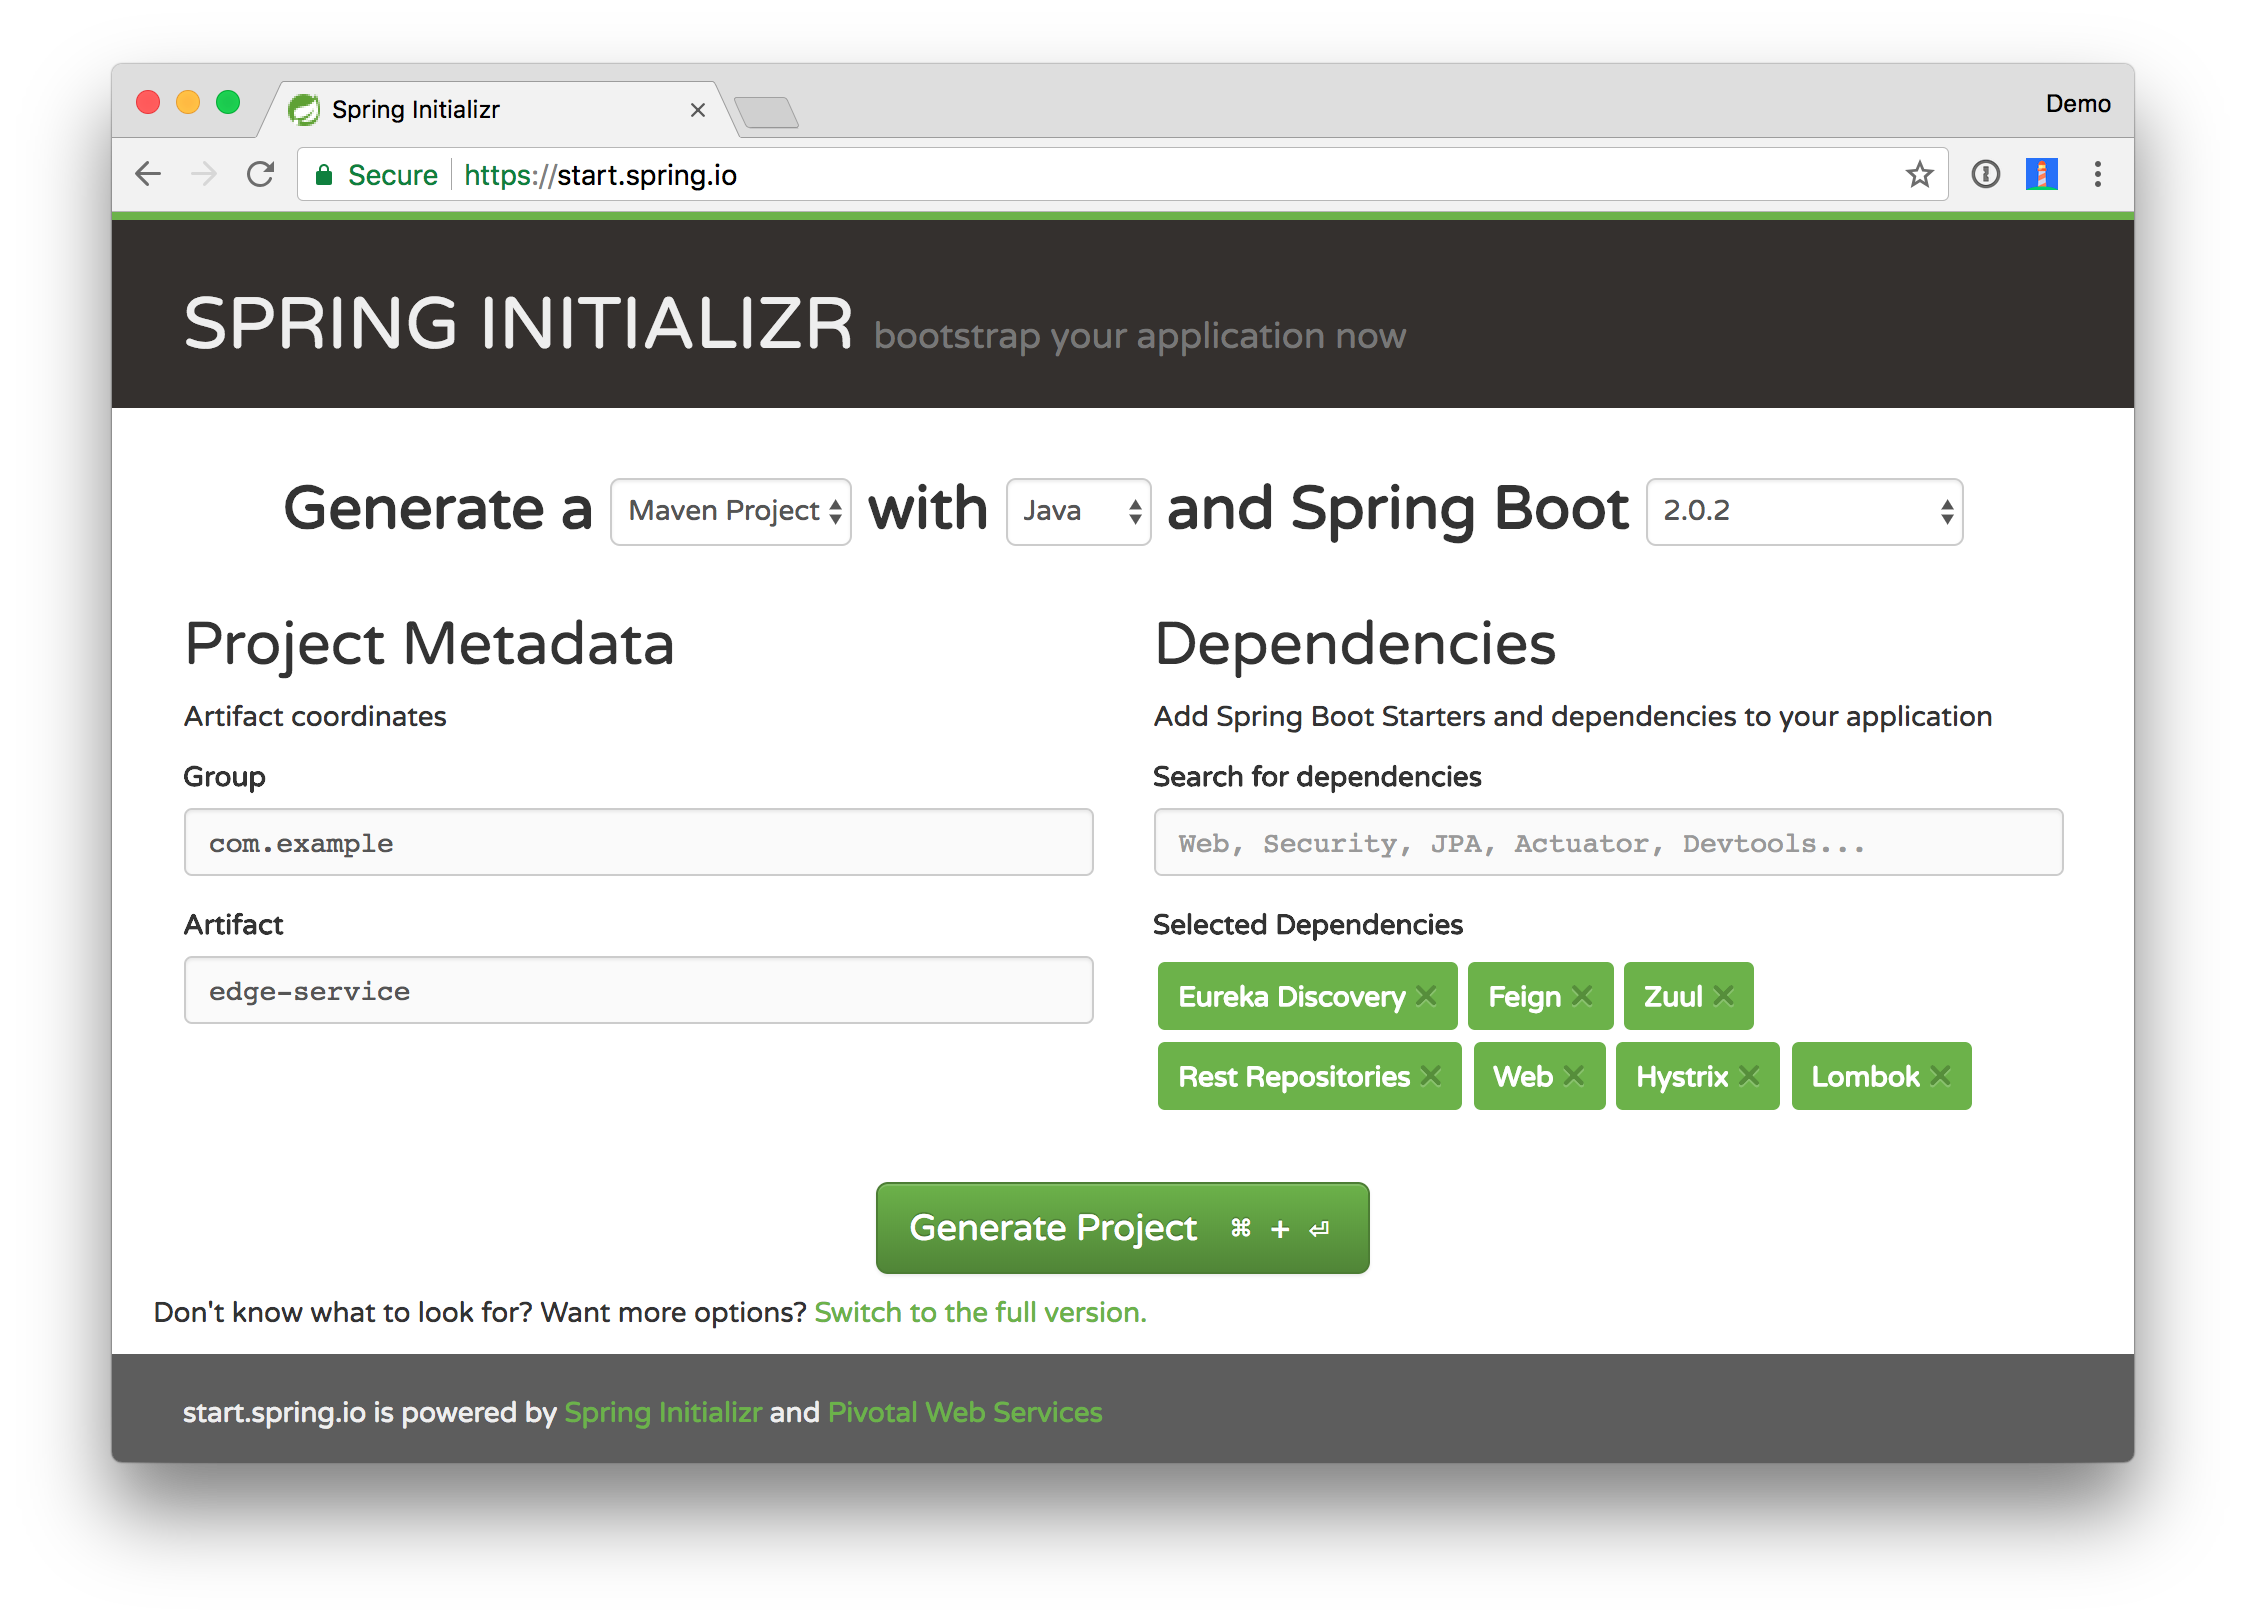
Click the Generate Project button and expand edge-service.zip into spring-boot-microservices-example and open
the project in your favorite IDE.
TIP: To create this same project using start.spring.io’s API, run the following:
http https://start.spring.io/starter.zip artifactId==edge-service bootVersion==2.0.5.RELEASE \
  name==edge-service  dependencies==cloud-eureka,cloud-feign,cloud-zuul,data-rest,web,cloud-hystrix,lombok \
  baseDir==edge-service | tar -xzvf -
Since the beer-catalog-service is running on port 8080, you’ll need to configure this application to run on a different
port. Modify edge-service/src/main/resources/application.properties to set the port to 8081 and set an application name.
server.port=8081
spring.application.name=edge-service
To enable Feign, Hystrix, and registration with the Eureka server, add the appropriate annotations to
EdgeServiceApplication.java:
package com.example.edgeservice;

import com.netflix.hystrix.contrib.javanica.annotation.HystrixCommand;
import lombok.Data;
import org.springframework.boot.SpringApplication;
import org.springframework.boot.autoconfigure.SpringBootApplication;
import org.springframework.cloud.client.circuitbreaker.EnableCircuitBreaker;
import org.springframework.cloud.client.discovery.EnableDiscoveryClient;
import org.springframework.cloud.netflix.feign.EnableFeignClients;
import org.springframework.cloud.netflix.feign.FeignClient;
import org.springframework.cloud.netflix.zuul.EnableZuulProxy;
import org.springframework.hateoas.Resources;
import org.springframework.web.bind.annotation.*;

import java.util.ArrayList;
import java.util.Collection;
import java.util.stream.Collectors;

@EnableFeignClients
@EnableCircuitBreaker
@EnableDiscoveryClient
@EnableZuulProxy
@SpringBootApplication
public class EdgeServiceApplication {

    public static void main(String[] args) {
        SpringApplication.run(EdgeServiceApplication.class, args);
    }
}
Create a Beer DTO (Data Transfer Object) in this same file. Lombok’s
@Data will generate a toString() methods, getters, setters, and
appropriate constructors.
@Data
class Beer {
    private String name;
}
Create a BeerClient interface that uses Feign to talk to the beer-catalog-service.
public class EdgeServiceApplication {

    public static void main(String[] args) {
        SpringApplication.run(EdgeServiceApplication.class, args);
    }
}

@Data
class Beer {
    private String name;
}

@FeignClient("beer-catalog-service")
interface BeerClient {

    @GetMapping("/beers")
    Resources<Beer> readBeers();
}
Create a RestController below the BeerClient that filters out less-than-great beers and exposes a /good-beers endpoint.
NOTE: To get beer.getName() to work in your IDE, you may need to install the Lombok plugin. In Intellij, you can
install it by going to Preferences -> Plugins -> Browse Plugins. Search for “lombok plugin” and click to install it.
Restart Intellij for the changes to take effect.
@RestController
class GoodBeerApiAdapterRestController {

    private final BeerClient beerClient;

    public GoodBeerApiAdapterRestController(BeerClient beerClient) {
        this.beerClient = beerClient;
    }

    @GetMapping("/good-beers")
    public Collection<Beer> goodBeers() {
        return beerClient.readBeers()
                .getContent()
                .stream()
                .filter(this::isGreat)
                .collect(Collectors.toList());
    }

    private boolean isGreat(Beer beer) {
        return !beer.getName().equals("Budweiser") &&
                !beer.getName().equals("Coors Light") &&
                !beer.getName().equals("PBR");
    }
}
Start the edge-service application with Maven or your IDE and verify it registers successfully with the Eureka server.
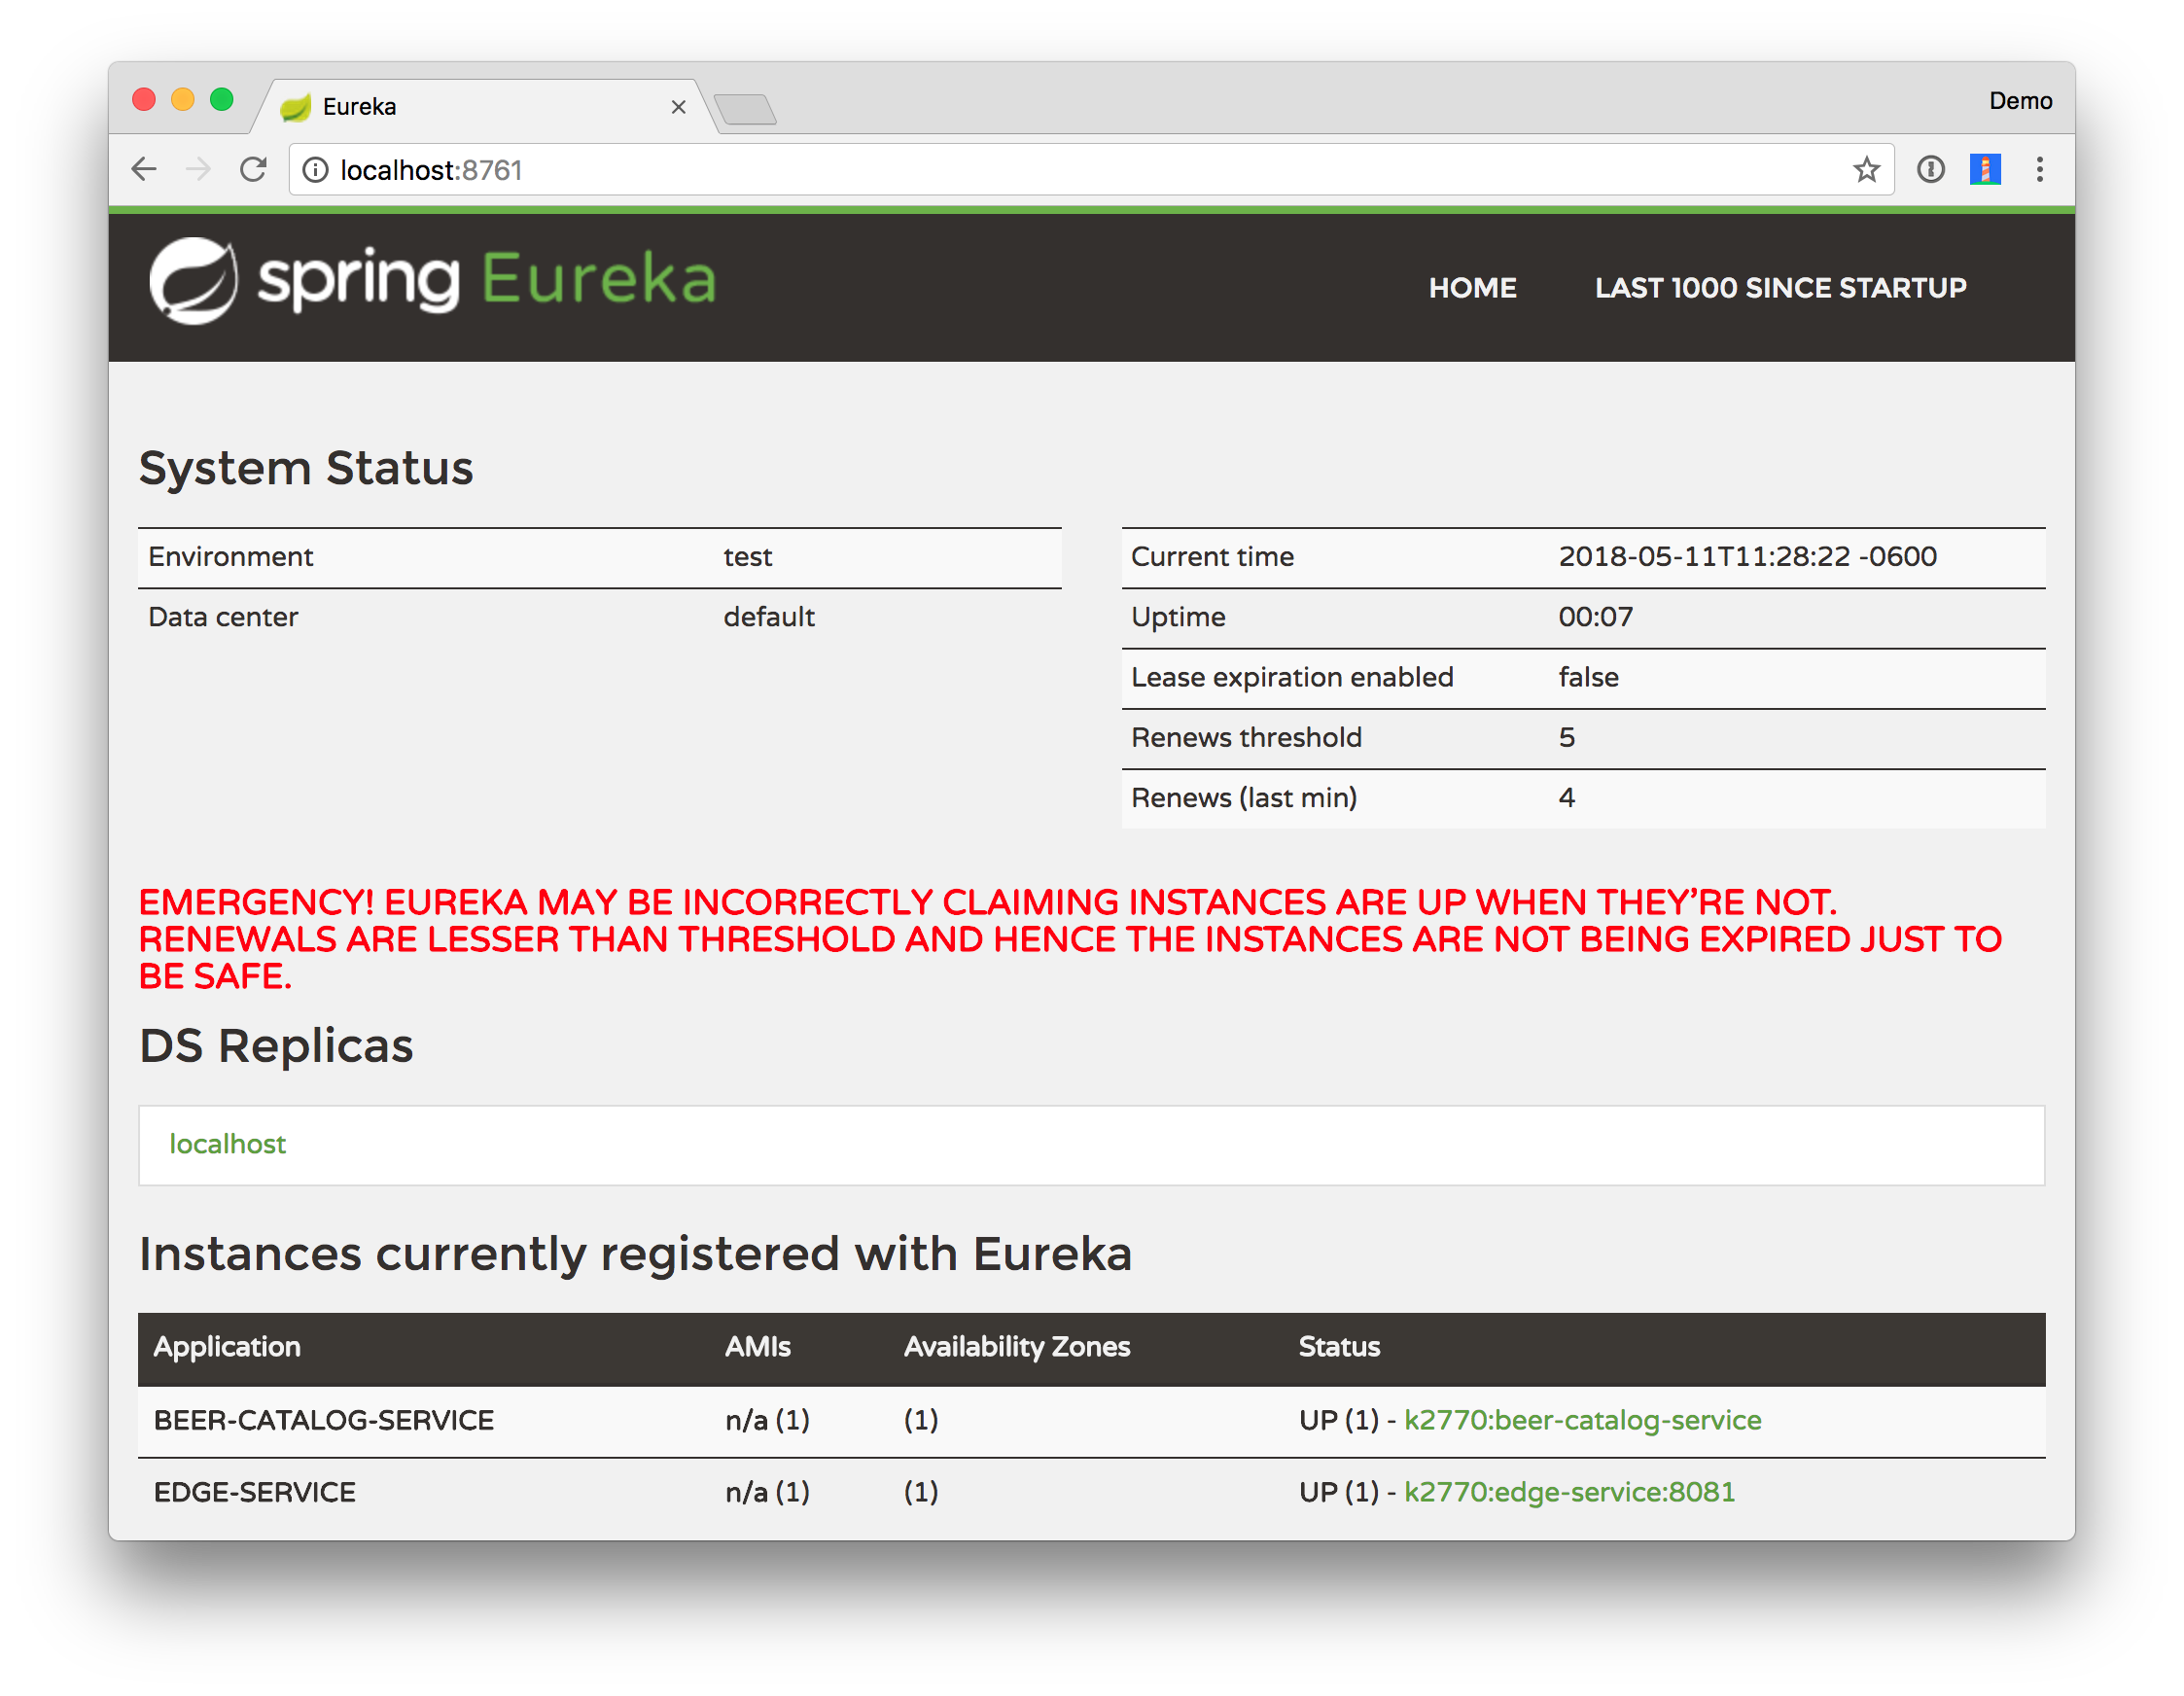
You should be able to invoke the /good-beers endpoint as well.
$ http :8081/good-beers
HTTP/1.1 200
Content-Type: application/json;charset=UTF-8
Date: Fri, 11 May 2018 17:28:55 GMT
Transfer-Encoding: chunked
[
    {
        "name": "Kentucky Brunch Brand Stout"
    },
    {
        "name": "Good Morning"
    },
    {
        "name": "Very Hazy"
    },
    {
        "name": "King Julius"
    }
]
This is cool, but if you shut down the beer-catalog-service application, you’ll get a 500 internal server error.
$ http :8081/good-beers
HTTP/1.1 500
Connection: close
Content-Type: application/json;charset=UTF-8
Date: Fri, 11 May 2018 17:35:39 GMT
Transfer-Encoding: chunked
{
    "error": "Internal Server Error",
    "message": "connect timed out executing GET http://beer-catalog-service/beers",
    "path": "/good-beers",
    "status": 500,
    "timestamp": "2018-05-11T17:35:39.201+0000"
}
To fix this, you can use Hystrix to create a fallback method and tell the goodBeers() method to use it.
public Collection<Beer> fallback() {
    return new ArrayList<>();
}

@HystrixCommand(fallbackMethod = "fallback")
@GetMapping("/good-beers")
public Collection<Beer> goodBeers() {
    return ...
}
Restart the edge-service and you should see an empty list returned.
$ http :8081/good-beers
HTTP/1.1 200
Content-Type: application/json;charset=UTF-8
Date: Fri, 11 May 2018 17:38:18 GMT
Transfer-Encoding: chunked
[]
Start the beer-catalog-service again and this list should eventually return the full list of good beer names.
Add an Angular PWA Client
You can copy the Angular PWA client I created in a previous tutorial and install its dependencies.
git clone https://github.com/oktadeveloper/spring-boot-angular-pwa-example.git
cp -r spring-boot-angular-pwa-example/client ~/spring-boot-microservices-example/.
cd ~/spring-boot-microservices-example/client
npm install
Then modify the BeerService in client/src/app/shared/beer/beer.service.ts to use port 8081 instead of 8080.
getAll(): Observable<any> {
  return this.http.get('http://localhost:8081/good-beers');
}
Modify GoodBeerApiAdapterRestController in EdgeServiceApplication.java to allow cross-origin requests from any client.
@GetMapping("/good-beers")
@CrossOrigin(origins = "*")
public Collection<Beer> goodBeers() {
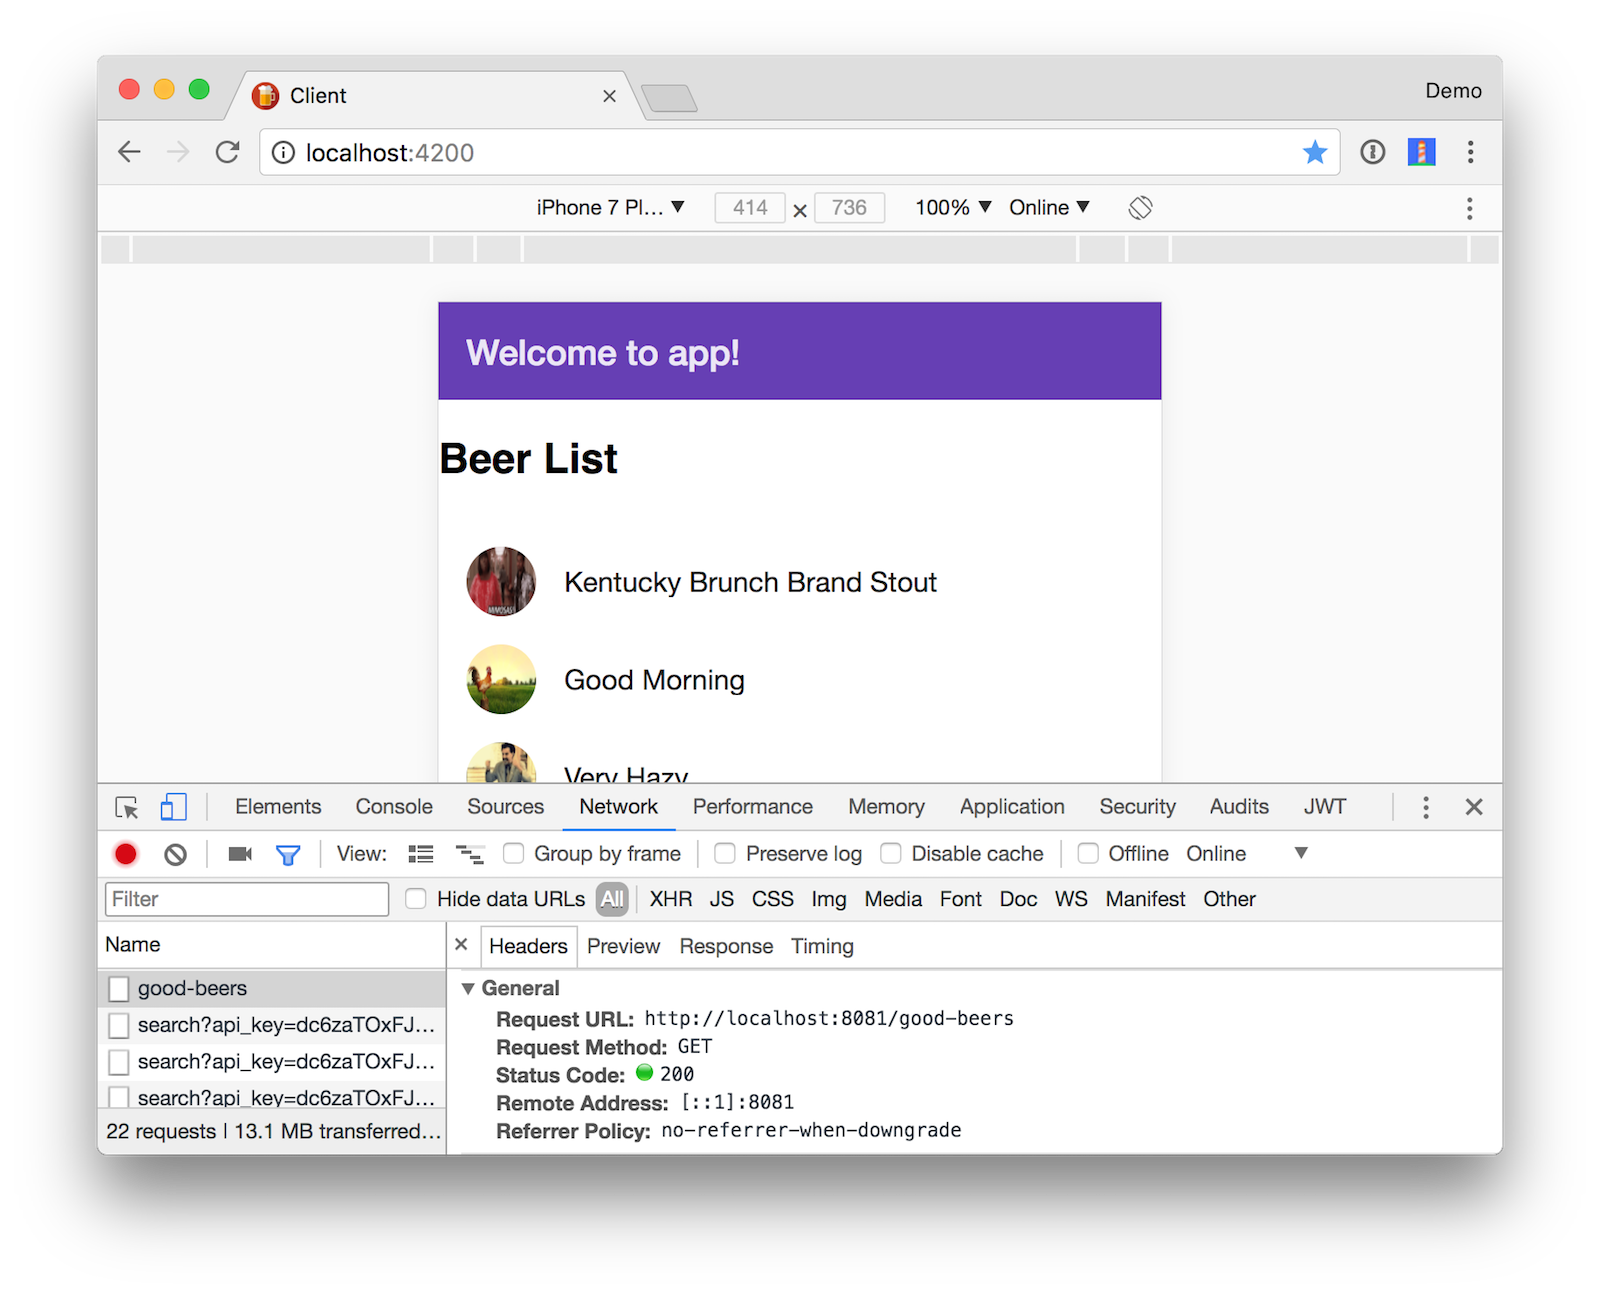
Restart the edge-service and start the Angular client by running npm start in the client directory.
Open http://localhost:4200 in your browser and verify that network calls to /good-beers go over port 8081.
Deploy to Cloud Foundry
In order to deploy the edge-service and beer-catalog-service to Cloud Foundry, you need to add configuration files
so they work with Cloud Foundry’s Eureka service.
Create edge-service/src/main/resources/application-cloud.properties and populate it with the following:
eureka.instance.hostname=${vcap.application.uris[0]:localhost}
eureka.instance.nonSecurePort=80
eureka.instance.metadataMap.instanceId=${vcap.application.instance_id:${spring.application.name}:${spring.application.instance_id:${server.port}}}
eureka.instance.leaseRenewalIntervalInSeconds = 5

eureka.client.region = default
eureka.client.registryFetchIntervalSeconds = 5
eureka.client.serviceUrl.defaultZone=${vcap.services.pwa-eureka-service.credentials.uri}/eureka/
Create beer-catalog-service/src/main/resources/application-cloud.properties and populate it with similar properties.
eureka.instance.hostname=${vcap.application.uris[0]:localhost}
eureka.instance.nonSecurePort=80
eureka.instance.metadataMap.instanceId=${vcap.application.instance_id:${spring.application.name}:${spring.application.instance_id:${server.port}}}
eureka.instance.leaseRenewalIntervalInSeconds = 5

eureka.client.region = default
eureka.client.registryFetchIntervalSeconds = 5
eureka.client.serviceUrl.defaultZone=${vcap.services.pwa-eureka-service.credentials.uri}/eureka/
In the properties above, pwa-eureka-service is the name you’ll give to the Eureka service when you deploy it to
Cloud Foundry.
To deploy it on Cloud Foundry with Pivotal Web Services, you’ll need to create an account,
download/install the Cloud Foundry CLI, and sign-in
(using cf login -a api.run.pivotal.io).
There are quite a few steps involved to deploy all the services and the Angular client for production. For that reason,
I wrote a deploy.sh script
that automates everything.
TIP: If you receive an error stating that you’re using too much memory, you may have to upgrade your Cloud Foundry subscription.
When to Use Microservices
Building a microservices architecture is something you should consider when you’re having difficulty scaling development in a large team. From a development standpoint, moving to microservices will not reduce complexity, but will likely increase it you move to a distributed system. Automation and orchestration are key for deployment. You should make sure to define your exit criteria (e.g. maximum time for a request to execute) before implementing your microservices infrastructure. You’re likely going to have to custom build some things, so be prepared for that. Trial a few different platforms and then pick the one that meets your criteria and is the easiest to develop with. Don’t develop half of your system on one platform and then try moving to another. Another tip is to make sure and record the request ID in all logging events for traceability.
If you have fewer than 20 developers, start with a monolith, but build in async messaging as soon as possible. Use it for things like mail, notifications, logging, and archiving. Debugging, deployment, and logging are much easier with a monolith because everything is contained in one application.
Also, consider using async messaging or other non-blocking communication methods with automatic back pressure. HTTP is a synchronous protocol and can be a limiting factor in high-traffic systems.
Learn More about Microservice Architectures
Spring Boot isn’t the only framework to implement embedded servlet containers or make it easy to develop microservices. In Javaland, there’s Dropwizard, MicroProfile for Java EE, Lagom, and Vert.x, and Tribestream.
You can find the source code for this article’s applications on GitHub at https://github.com/oktadeveloper/spring-boot-microservices-example.
You can also watch a video of me and Josh Long developing these applications in a YouTube recording of our Cloud Native PWAs presentation at Devoxx France, 2017.
If you have any questions about this article, you can email me at matt.raible@okta.com, post a question to Stack Overflow with the Okta tag, post to our Developer Forums, or create an issue on GitHub.
Update: To learn about how security fits into all this, see Secure a Spring Microservices Architecture with Spring Security, JWTs, Juiser, and Okta.
Update 2: To learn how to lock this application down with Spring Security and OAuth, see Secure a Spring Microservices Architecture with Spring Security and OAuth 2.0.
Changelog:
- Oct 11, 2018: Updated to use Spring Boot 2.0.5 and Spring Cloud Finchley SR1. See the example app changes in spring-boot-microservices-example#20; changes to this post can be viewed in okta.github.io#2389.
- May 11, 2018: Updated to use Spring Boot 2.0. See the example app changes in spring-boot-microservices-example#18; changes to this post can be viewed in okta.github.io#2046.
- Feb 8, 2018: Updated to use use Spring Boot 1.5.10, Angular CLI 1.6.7, and Angular 5.2.0. See the code changes in the example app on GitHub. Changes to this article can be viewed in this pull request.
- Jan 17, 2018: Updated to use latest client from Build Your First Progressive Web Application with Angular and Spring Boot. See the code changes in the example app on GitHub. Changes to this article can be viewed in this pull request.
Okta Developer Blog Comment Policy
We welcome relevant and respectful comments. Off-topic comments may be removed.