Build a Secure C# MCP App with Cross App Access (XAA)

A few years ago, getting a user signed in to an application or multiple applications with Single Sign-On (SSO) was enough; OpenID Connect (OIDC) handled the login, JWTs carried the claims, and Proof Key for Code Exchange (PKCE) made it secure. Today, with evolving AI, agents act on behalf of users and seek multiple accesses across different resources to execute a task. And that is when you’ll hit the gap.
The user has an identity, but the downstream service—like a Model Context Protocol (MCP) server, an API, or an agent tool has no way to trust it: the ID Token that proves the user’s identity for your app, not for that service. You need a way to take that identity and have it trusted further down the chain, in line with the org’s policy, without asking the user to log in again.
Cross App Access (XAA) solves exactly that. The user authenticates once. The Identity Provider (IdP) evaluates the enterprise policy and issues a signed Identity Assertion. The downstream service exchanges that assertion for a scoped Bearer token.
In this post, we’ll explore how Cross App Access (XAA) closes the trust gap, test the flow using an XAA playground, and implement a secure MCP client in just a few lines of C# using our dedicated SDK.
Table of Contents
- What is Cross App Access (XAA)?
- Implementing XAA with the C# MCP SDK
- Testing your C# MCP app with xaa.dev
- Run your C# MCP app with xaa.dev
- Learn More About Secure AI Agent Development with C# and MCP
What is Cross App Access (XAA)?
Before we start implementing and building the application, it is important to understand the mechanics of Cross App Access (XAA). At its core, XAA is an open standard that securely enables AI agents to act on behalf of a user and communicate with downstream applications without requiring constant, manual user consent.
While the flow is sophisticated, it relies on two standard interactions:
- RFC 8693 (Token Exchange): The requesting app exchanges an OIDC ID token for a JWT Authorization Grant (JAG) at the enterprise Identity Provider.
- RFC 7523 (JWT Bearer Grant): The app presents this JAG to the MCP authorization server to receive a scoped access token for the resource.
The diagram below gives a complete flow for XAA and token exchanges.
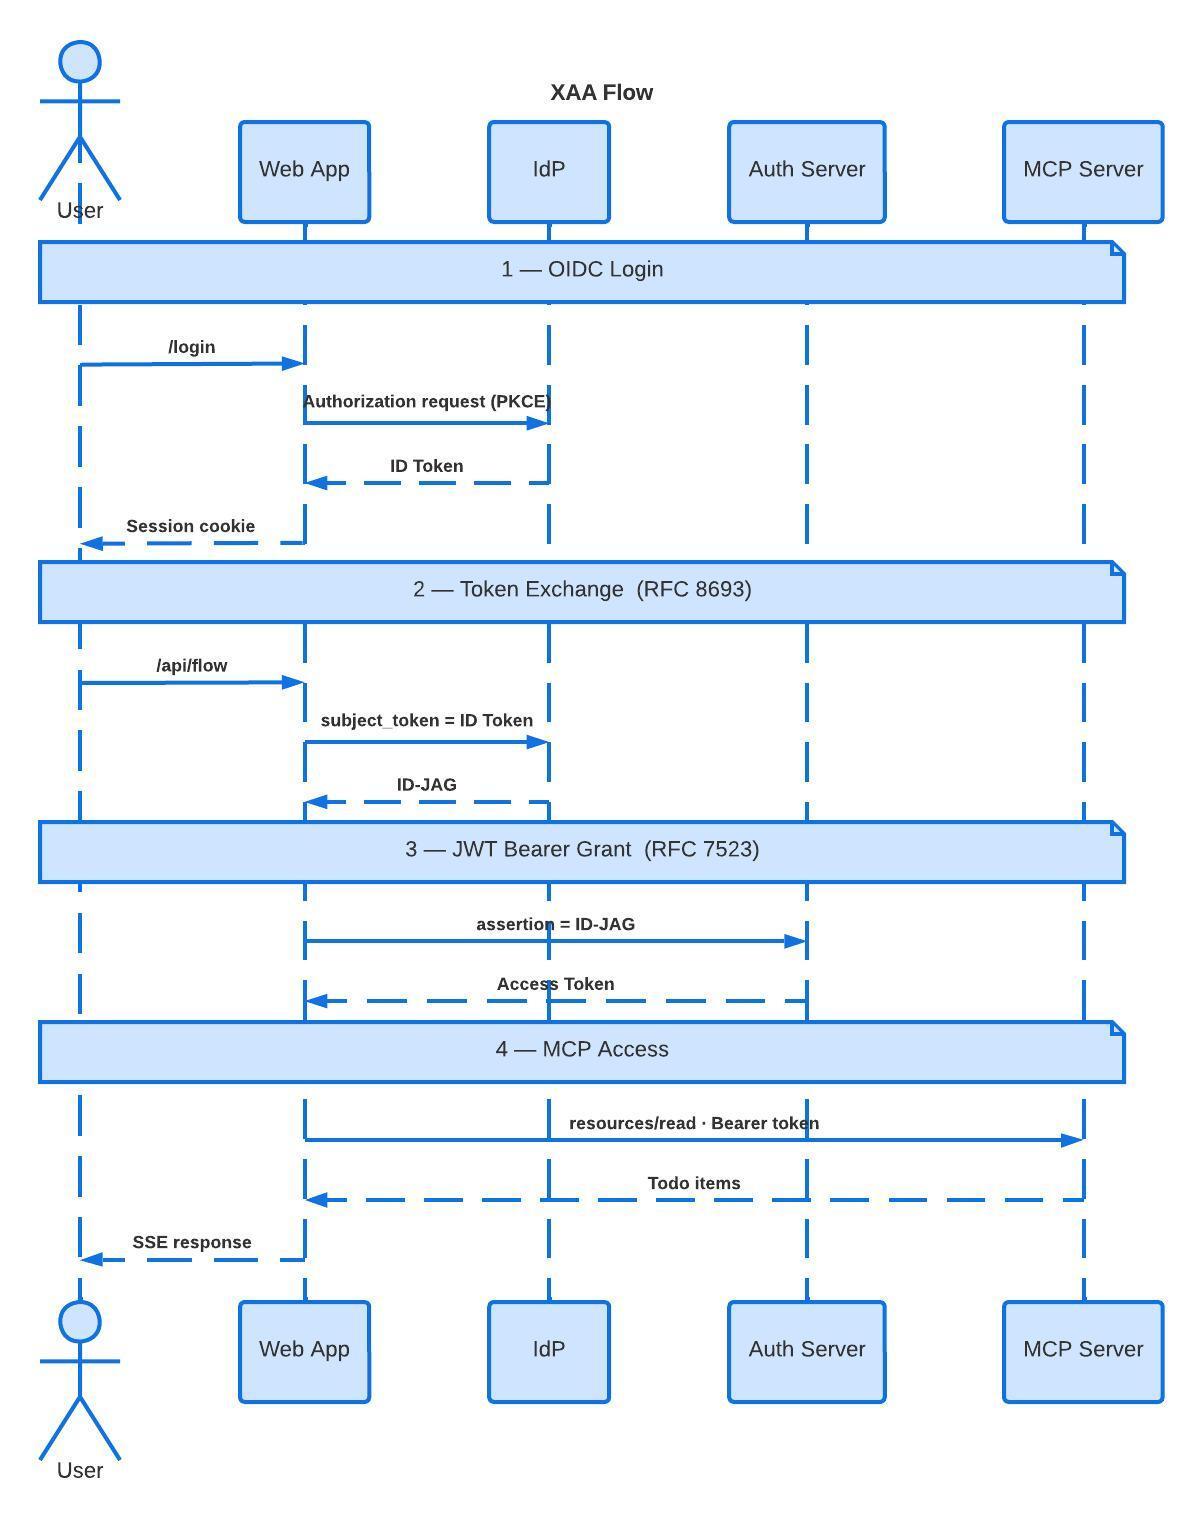
You can find a complete flow diagram and explanation of XAA in the “Integrate Your Enterprise AI Tools with Cross App Access” blog.
In the next steps, let us understand how to implement the 4 steps of XAA using the MCP software development kit (SDK).
Implementing XAA with the C# MCP SDK
Building this manually would require you to manage complex cryptographic handshakes. Instead, we’ll use the C# MCP SDK; more details are available in the official GitHub repository. The C# MCP SDK’s IdentityAssertionGrantProvider handles all the heavy lifting, abstracting these RFCs into a clean, developer-friendly interface that lets you focus on your agent logic rather than the authentication plumbing. Let us implement that step by step.
Building the OIDC flow
ASP.NET Core has a built-in OIDC middleware that handles the full authentication flow, including PKCE. Since the package handles the implementation, all we have to do is configure our values.
builder.Services
    .AddAuthentication()
    .AddCookie(o => { o.Cookie.Name = "xaa.auth"; })
    .AddOpenIdConnect(o =>
    {
        o.Authority    = config["Xaa:IdpBaseUrl"];
        o.ClientId     = config["Xaa:ClientId"];
        o.ResponseType = "code";
        o.UsePkce      = true;
        o.SaveTokens   = true; // ID Token persisted into the auth cookie
        o.MapInboundClaims = false;
        o.Scope.Add("openid");
        o.Scope.Add("email");
    });
An important thing to note here is that MapInboundClaims = false, which stops ASP.NET Core from remapping standard OIDC claim names to legacy WS-Federation names, keeping the token payload clean and predictable downstream.
Automate XAA token exchange with C# SDK
This step marks the start of the XAA flow. With the SDK, instead of the user directly authorizing the MCP client, the app performs a two-hop token upgrade on the user’s behalf, and the MCP C# SDK’s IdentityAssertionGrantProvider encapsulates both exchanges.
The application presents the user’s ID token to the IdP and represents the user’s identity to the MCP server. The IdP responds with an ID-JAG, a short-lived token that grants access to the resource server. You then exchange this ID-JAG for an access token to access the server.
var provider = new IdentityAssertionGrantProvider(
    new IdentityAssertionGrantProviderOptions
    {
        ClientId         = config["Xaa:McpClientId"]!,
        ClientSecret     = config["Xaa:McpClientSecret"],
        IdpTokenEndpoint = $"{config["Xaa:IdpBaseUrl"]}/token",
        IdpClientId      = config["Xaa:ClientId"]!,
        IdpClientSecret  = config["Xaa:ClientSecret"],
        Scope            = "todos.read mcp.access",

        // Called by the SDK when it needs the current user's ID Token
        IdTokenCallback = (_, _) => Task.FromResult(idToken)
    },
    httpClient);

var result = await provider.GetAccessTokenAsync(
    resourceUrl:           new Uri(config["Xaa:McpServerUrl"]!),
    authorizationServerUrl: new Uri(config["Xaa:AuthServerUrl"]!));

var accessToken = result.AccessToken;
With the IdTokenCallback, the provider retrieves the user’s ID Token from the session.
Connect the MCP client to the server
After the exchanges, this is the final part, where the client can now access the MCP server and use the resource data. The HTTP-based servers handle session negotiation and message framing.
//Set up the transport with the exchanged access token
var transport = new HttpClientTransport(new HttpClientTransportOptions
{
    Endpoint          = new Uri(config["Xaa:McpServerUrl"]!),
    TransportMode     = HttpTransportMode.StreamableHttp,
    AdditionalHeaders = new Dictionary<string, string>
    {
        ["Authorization"] = $"Bearer {accessToken}"
    }
});

// Initialize the MCP client
await using var client = await McpClient.CreateAsync(transport);
McpClient.CreateAsync performs the MCP initialization handshake, exchanging the protocol version and capabilities with the server before making any resource request. From here on, interacting with the server is straightforward.
var resources = await client.ListResourcesAsync(); //lists all the available URIs
var result    = await client.ReadResourceAsync("todo0://todos");

var raw = string.Join("",
    result.Contents
          .OfType<TextResourceContents>()
          .Select(c => c.Text ?? ""));
This app uses todo0://todos to fetch from the xaa.dev resource server. The complete sample code for the app is available in the linked GitHub repository.
Testing your C# MCP app with xaa.dev
Now that we’ve stepped through the XAA flow, it’s time to test it. xaa.dev is a testing playground. It provides a standardized, functional environment that lets you verify your end-to-end flow immediately and serves as the bridge between your app and the downstream resource.
To test out the application using the xaa.dev platform, follow the steps below to get the app registered as the requester app:
- Register your requesting application at xaa.dev
- Enter your email and click on Continue and Register New App.
- Enter the Redirect URI and Post-logout URI as below.
- Click on the Add Resource section and select ToDo MCP Server.
- Click on Register App, and your app is now registered as a requester app in the XAA flow.
You should have your connections set up like in the screenshot below.
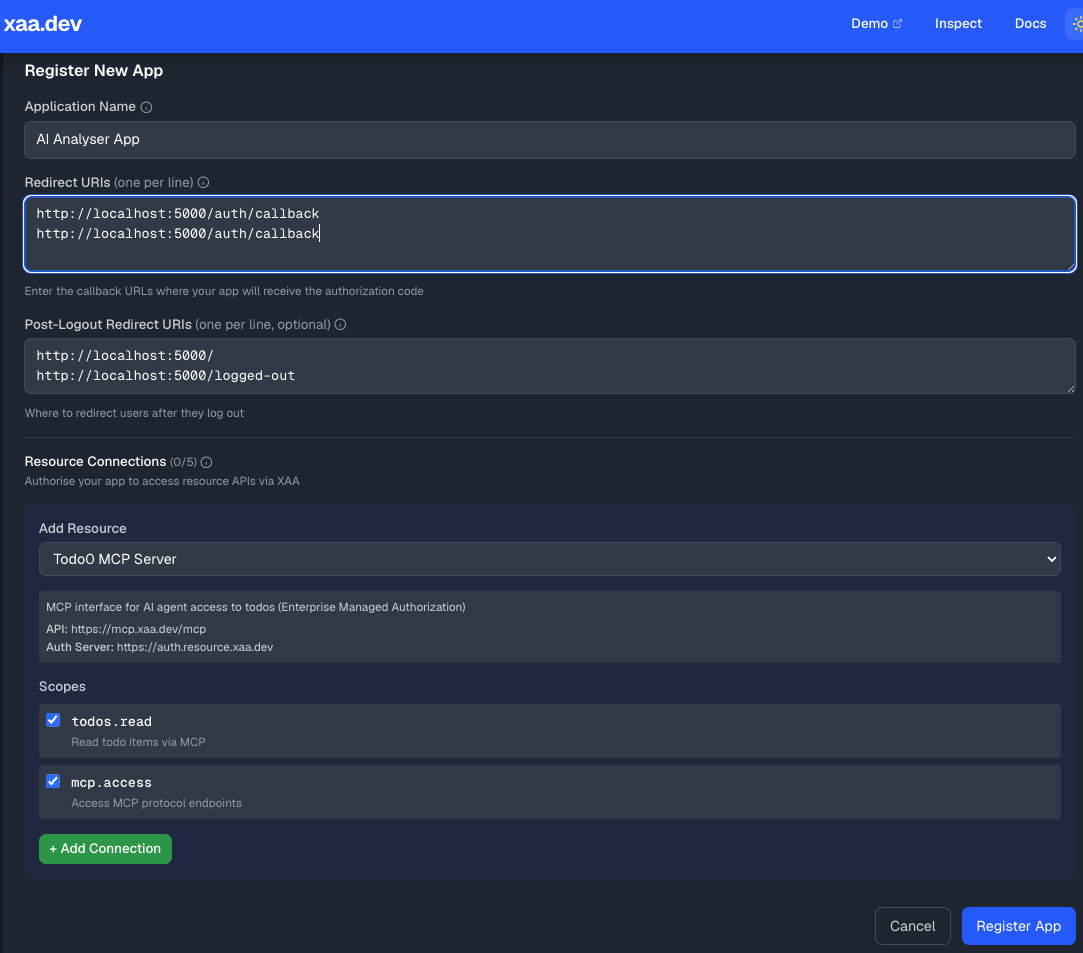
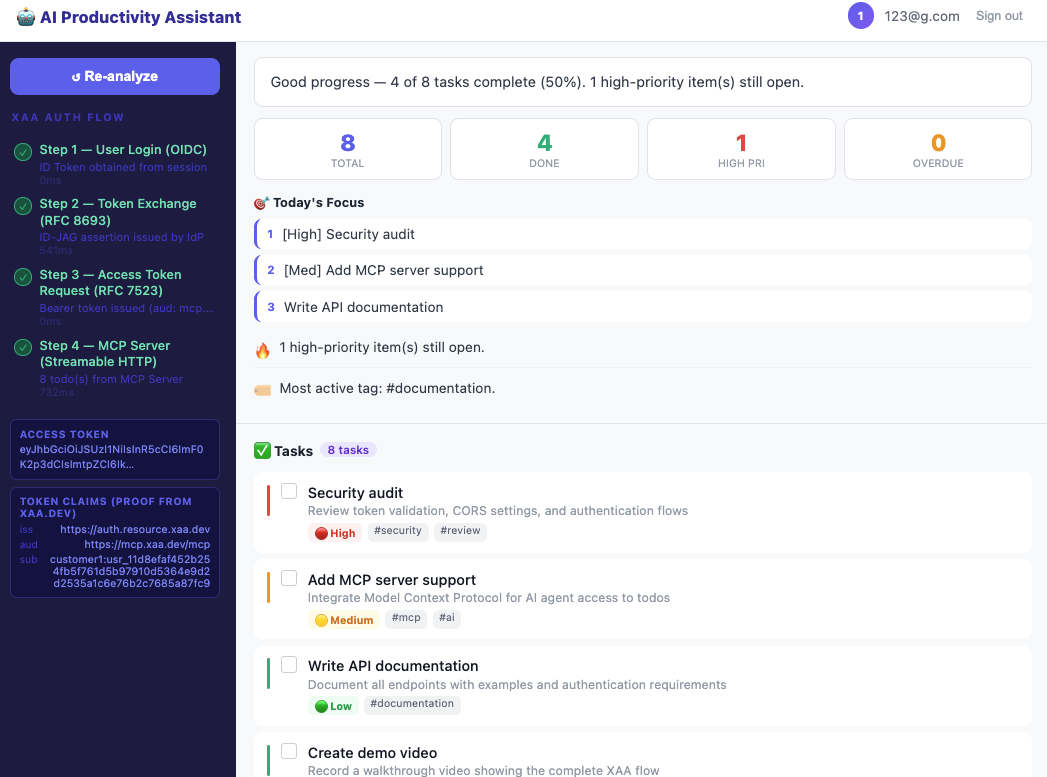
In this example, the C# app is a requester app that fetches the to-do list from the Todo app and analyzes the tasks fetched.
Run your C# MCP app with xaa.dev
At this point, you should have your application ready, running on port 5000, and connected to the XAA sample resource app. If not, you can clone the repo from the GitHub repository and add the following environment variables to the appsettings.json file:
git clone https://github.com/oktadev/csharp-mcp-sdk-example.git
cd xaa-csharp-mcp-sdk-example
{
  "Xaa": {
    "ClientId":        "<your-client-id>",
    "ClientSecret":    "<your-client-secret>",
    "IdpBaseUrl":      "https://idp.xaa.dev",

    "McpClientId":     "<your-mcp-client-id>",
    "McpClientSecret": "<your-mcp-client-secret>",

    "AuthServerUrl":   "https://auth.resource.xaa.dev",
    "McpServerUrl":    "https://mcp.xaa.dev/mcp",

    "RedirectUri":     "http://localhost:5000/callback"
  },
  "Logging": {
    "LogLevel": { "Default": "Information", "Microsoft.AspNetCore": "Warning" }
  },
  "AllowedHosts": "*"
}
Make sure to copy the correct client ID and secrets from xaa.dev. Once done, run the app.
dotnet run
Go to http://localhost:5000/, and you should see the app.
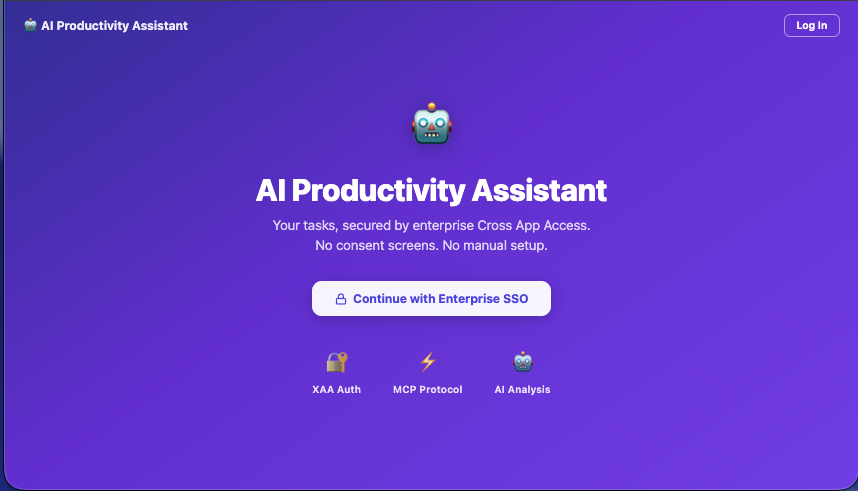
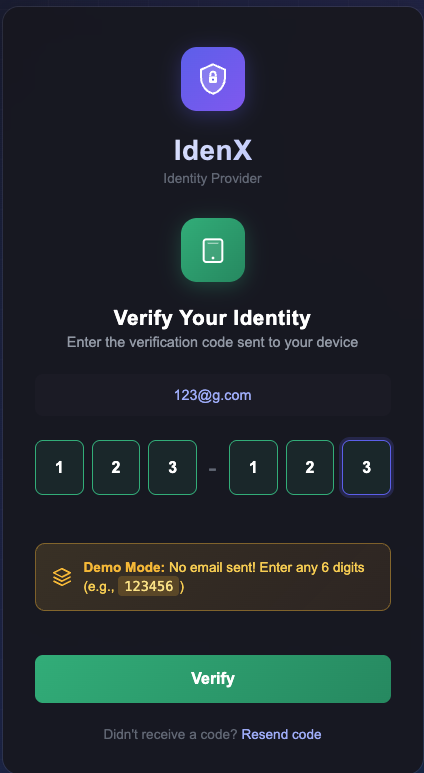
Sign in to the app using a test email and provide a random verification code as below. Once you sign in, the XAA playground handles the login request; you can verify this by checking the URL on your screen.
Once done, you should see the analyzer app running the XAA flow, displaying all details and analyzing all To-Do tasks.
The MCP SDK and XAA simplify building and testing cross app access.
Learn More About Secure AI Agent Development with C# and MCP
What you’ve seen here is the full XAA flow, starting from a user signing in with SSO to an AI agent securely fetching data from an MCP server running end-to-end in under 50 lines of C#.
The XAA playground (xaa.dev) makes this tangible without any infrastructure overhead. The IdP, the Auth Server, the MCP resource server — it’s all there, ready for you to register your app, drop in the credentials, and watch the token exchanges happen in real time. That’s the fastest path from concept to a working implementation.
If you wish to read further:
- Test the full source for this demo in the GitHub repository
- Register your own app and explore the XAA playground at xaa.dev
- Read the deep dive on how XAA closes the enterprise trust gap in Integrate Your Enterprise AI Tools with Cross App Access
As AI agents take on more complex, multi-step tasks across organizational boundaries, XAA is the secure solution that enables this without compromising security or user experience. Now you have the tools to build it.
Remember to follow us on X and subscribe to our YouTube channel for more exciting content. We also want to hear from you about the topics you’d like to see and any questions you may have. Leave us a comment below!
Aasawari Sahasrabuddhe is a Senior Builder Advocate at Okta, a tech enthusiast, community builder, and educator. She specializes in bridging backend engineering with strategic community and content engagement. She is recognized as a MongoDB Champion with a strong foundation in Java, Spring Boot, and cloud-native technologies. She has a proven track record in technical writing and delivering hands-on workshops.
Okta Developer Blog Comment Policy
We welcome relevant and respectful comments. Off-topic comments may be removed.